
A PDF collection to make full use of R1R2S2: Master RCI to win!!
【Master RCI to Win Extremely!! Trend Reversal・Pullback Buy・Pullback Sell】
Indicator【BODSOR・mBDSR】that shines when combined with RCI
and the method・case studies (PDF) ★GogoJungle AWARD2020 winner★
https://www.gogojungle.co.jp/tools/indicators/11836
※This product includes 358 PDFs (over 1,400 pages in total, over 1,350 charts, over 470,000 characters) as part of the method・case studies.
※Additionally, separate PDFs for short-term 1-minute trades, 5-minute day trading, and MT5 have been added.
※Furthermore, recently, apart from the above PDFs, an additional PDF to effectively utilize R1R2S2 has been added (method・case study, over 65 pages, over 65 charts, over 20,000 characters).
Examples of R1R2S2 Signals
(June 17, 2025, GBPUSD 30-min chart, pullback sell +75 pips)
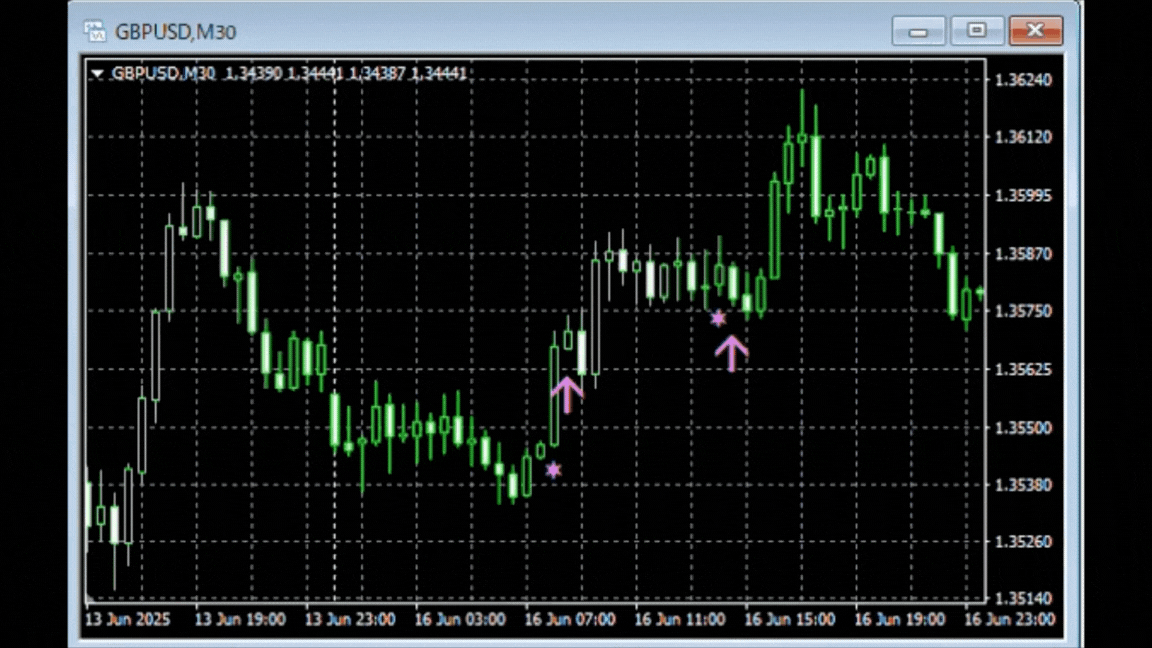
(Refer to attached PDF “mBDSRhint_R1R2S2_9_20250618.pdf”.)
The main indicator included in this product,mBDSR signalsnot only, but also, as in the chart above,R1R2S2 signalscan greatly expand trading opportunities when mastered.
Using the RCI three-lineto drill down from higher time frames to lower time frames,wait for the mBDSR signalto light up, and in cases where it does not light or you miss the signal or are late,R1R2S2 signalscan be used as a response, andR1R2S2is often used in conjunction withmBDSR.
Therefore, in the newly added PDFs,R1R2S2 signalsare given emphasis in explanations.
Effective use of R1R2S2 signalsThe file names and titles of the PDFs as of February 6, 2026 are as follows. There were already PDFs that touched onR1R2S2 signals, and those are also introduced here.
(0) mBDSRhint_R1R2S2_0_20250614.pdf
On using mBDSR (RCI two-line filter) together with R1R2S2
(1) mBDSRhint_R1R2S2_1_20250616.pdf
Two-bar reversal with mBDSR and R1R2S2 signals
(2) mBDSRhint_R1R2S2_2_20250619V1.pdf
Example of rising from the 4-hour RCI9 bottom with combined use of mBDSR and R1R2S2
(3) mBDSRhint_R1R2S2_3_20250626V3.pdf
How to respond when the monthly chart is strong: notable past highs, moving averages, and R1R2S2 signals
(4) mBDSRhint_R1R2S2_4_20250619V1.pdf
Example of pullback buying on the 1-hour level (with mBDSR and R1R2S2)
(5) mBDSRhint_R1R2S2_5_20250617.pdf
How to respond to pullbacks when the 15-minute chart is weak (with mBDSR and R1R2S2)
(6) mBDSRhint_R1R2S2_6_20250617.pdf
4-hour RCI9 topping response example (mBDSR and R1R2S2 combined)
(7) mBDSRhint_R1R2S2_7_20250617.pdf
How to respond to pullbacks when the 1-hour chart is weak (mBDSR and R1R2S2)
(8) mBDSRhint_R1R2S2_8_20250618.pdf
Examples of handling near resistance lines (utilizing R1R2S2)
(9) mBDSRhint_R1R2S2_9_20250624V1.pdf
Examples when the 4-hour chart is weak (using R1R2S2, take-profit considerations)
(10) mBDSRhint_R1R2S2_10_20250619.pdf
4-hour RCI9 bottom to rise: using four RCI and R1R2S2 signals
(11) mBDSRhint_R1R2S2_11_20250619.pdf
1-hour pullback selling pattern with mBDSR and R1R2S2
(12) mBDSRhint_R1R2S2_12_20250619.pdf
4-hour RCI2 double bottom rise: using mBDSR and R1R2S2
(13) mBDSRhint_R1R2S2_13_20250619.pdf
4-hour RCI9 bottom rise: using moving averages, pin bars, and R1R2S2
(14) mBDSRhint_R1R2S2_14_20250619.pdf
On rising from 4-hour RCI2 double bottom (mBDSR and R1R2S2 together)
(15) mBDSRhint_R1R2S2_15_20250620.pdf
1-hour strong pattern pullback buying (with mBDSR and R1R2S2)
(16) mBDSRhint_R1R2S2_16_20250620.pdf
4-hour RCI9 bottom rise: using mBDSR and R1R2S2 together
(17) mBDSRhint_R1R2S2_17_20250621.pdf
When the 15-minute chart is weak, considering 1-minute pullback selling using R1R2S2
(18) mBDSRhint_R1R2S2_18_20250621.pdf
Consideration of pullback buying from the short-term RCI bottom on 30-minute chart (utilizing R1R2S2)
(19) mBDSRhint_R1R2S2_19_20250622.pdf
Pullback buying considerations focusing on moving averages and pin bars (with mBDSR and R1R2S2)
(20) mBDSRhint_R1R2S2_20_20250621.pdf
1-hour pullback buy pattern examples (with mBDSR and R1R2S2)
(21) mBDSRhint_R1R2S2_21_20250621.pdf
Pullback buy after rebound near moving averages (with mBDSR and R1R2S2)
(22) mBDSRhint_R1R2S2_22_20250624.pdf
If the monthly chart is strong: daily-level pullback buy with mBDSR and R1R2S2
(23) mBDSRhint_R1R2S2_23_20250624.pdf
4-hour RCI2 double top: mBDSR (moving average filter) and R1R2S2
(24) mBDSRhint_R1R2S2_24_20250624.pdf
When the 4-hour chart is strong: examples of responses (take-profit targets with R1R2S2)
(25) mBDSRhint_R1R2S2_25_20250702V1.pdf
What to do when the monthly chart is strong: moving averages and R1R2S2 signals
(26) mBDSRhint_R1R2S2_26_20250702.pdf
When the monthly chart is weak: pullback selling on lower timeframes using R1R2S2 signals
(27) mBDSRhint_R1R2S2_27_20250702.pdf
30-minute pullback selling when the 30-minute chart is weak (using R1R2S2)
(28) mBDSRhint_R1R2S2_28_20250702.pdf
30-minute pullback selling when the 30-minute chart is weak (using R1R2S2)
(29) mBDSRhint_R1R2S2_29_20250703.pdf
Pushback buying when the 30-minute chart is strong (using R1R2S2 signals)
(30) mBDSRhint_R1R2S2_31_20250703.pdf
Pullback selling when the 30-minute chart is weak (using R1R2S2 signals)
(31) mBDSRhint_R1R2S2_31_20250706.pdf
When the monthly chart is strong: pullback buying focusing on swing lows and R1R2S2 signals
=====================
◯ mBDSRhint741_20231102.pdf
Daily RCI9 topping-range sticking example (mBDSR and R1R2S2 signals)
◯ mBDSRhint742_20231102.pdf
5-minute RCI9 topping-range sticking example (mBDSR and R1R2S2 signals)
◯ mBDSRhint743_20231102.pdf
4-hour EMA200 and mBDSR and R1R2S2
◯ mBDSRhint744_20231102.pdf
4-hour EMA21 and 1-hour EMA200 and R1R2S2 signals
◯ mBDSRhint745_20231102.pdf
Weekly-level double bottom possibility and daily EMA21 and R1R2S2 signals
◯ mBDSRhint746_20231102.pdf
4-hour resistance and notable lows with mBDSR and R1R2S2 signals
◯ mBDSRhint1351_20241102.pdf
Response examples when mBDSR signal does not light up (5-minute RCI9 topping-range)
◯ mBDSRhint1352_20241102.pdf
Response examples when mBDSR signal does not light up (1-hour RCI9 topping-range)
◯ mBDSRhint1380_20250612.pdf
4-hour RCI3 double top downside example (mBDSR and R1R2S2 combined)
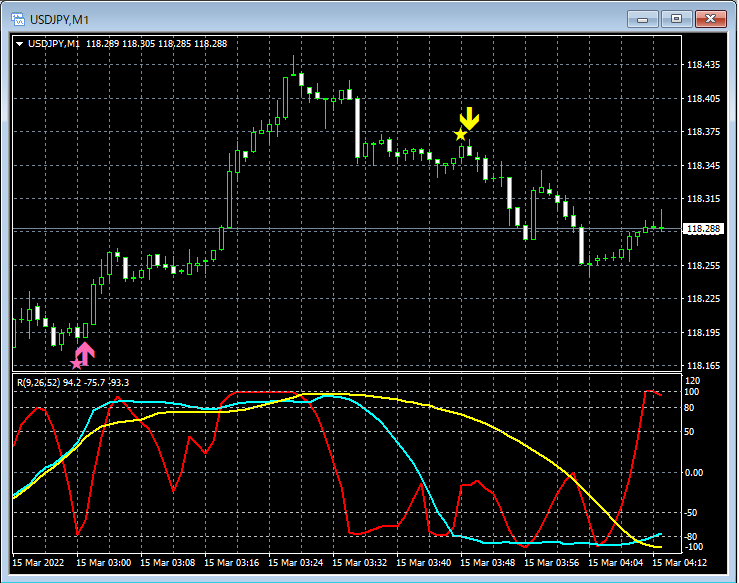
◯ mBDSRhint_M1_59_20250612.pdf
4-hour RCI9 topping-range short-term downside response (mBDSR and R1R2S2 combined)
◯ mBDSRhint_5M_38_20250612.pdf
Pullback consideration when the 30-minute chart is weak (mBDSR and R1R2S2 combined)
=====================
◯ mBDSRhint_M1_61_20250626.pdf
Pullback selling from pin bars on higher time frames (using R1R2S2)
◯ mBDSRhint_5M_40_20250626.pdf
30-minute pullback selling when the 30-minute chart is weak (watching resistance, using R1R2S2)
=====================
◯ mBDSRhint1392_20250701.pdf
When the daily chart is strong: pullback buying with MA filter and R1R2S2
◯ mBDSRhint1395_20250703.pdf
When the 30-minute chart is weak: pullback selling with MA filter and R1R2S2
◯ mBDSRhint_M1_69_20250702.pdf
5-minute RC9 bottom: short-term rebound example (SakataGohō “Morning Star,” utilization of R1R2S2)
=====================
◯ mBDSRhint_5M_51_20260205.pdf
Pullback buying on the rise from the 30-minute short-term RCI bottom (also watch support lines and pin bars)
=====================
Indicator that shines when combined with RCI【BODSOR・mBDSR】
and the method・case studies (PDF) ★GogoJungle AWARD2020 winner★
https://www.gogojungle.co.jp/tools/indicators/11836
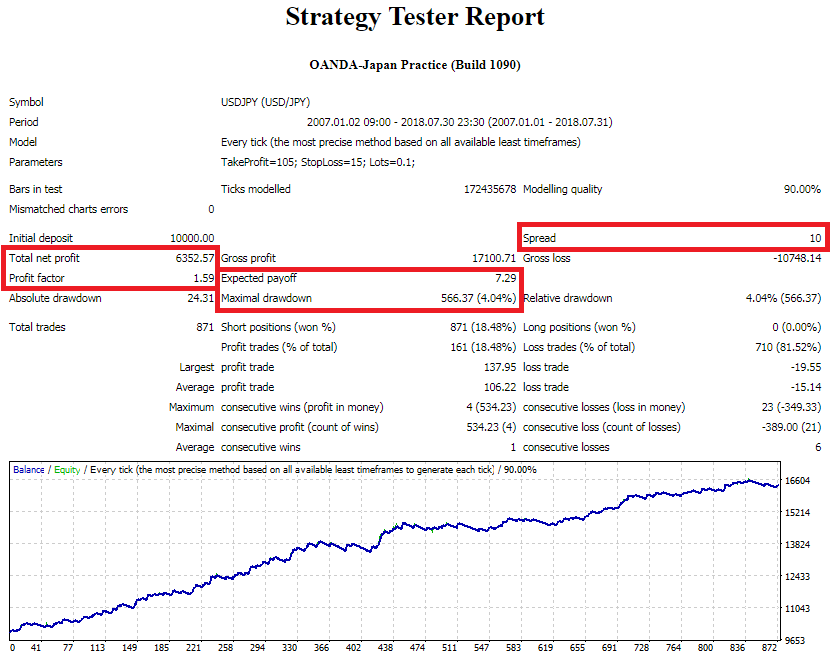
The PDF file includes 358 items (over 1,400 pages in total, over 470,000 characters).
Many of them are designed to logically link higher and lower time frames using the three-line RCI, examining multiple lower-time-frame conditions step by step, and ultimately waiting for pullbacks or pullback buys on the lower time frames (i.e., mBDSR signals).
Additionally,there is a focus on capturing overlapping entry reasonsin many items.
Also included is a method for exploring upside and downside targets using the three-line RCI.
In the explanations within the PDF files,more than 1,350 chartsare used.

× ![]()