
[RCI3 Three-Line + mBDSR] Case Study
Indicator that shines in combination with RCI: BODSOR・mBDSR
https://www.gogojungle.co.jp/tools/indicators/11836
※ An indicator developed to improve entry accuracy when using the RCI three-line method for buying on pullbacks and selling on rallies
Yesterday, 20 bonus PDF files were added. As a result, the total number of bonus files is 80.
The content largely consists of case studies that link higher and lower timeframes logically using the RCI three-line method, sequentially considering the conditions of multiple lower timeframes, and ultimately waiting for the timing to buy on pullbacks or sell on rallies at the lower timeframe (the mBDSR sign)is extensive.
The titles of the recently added PDF files are as follows.
57th accompanying bonus PDF【mBDSRhint57_20201013.pdf】
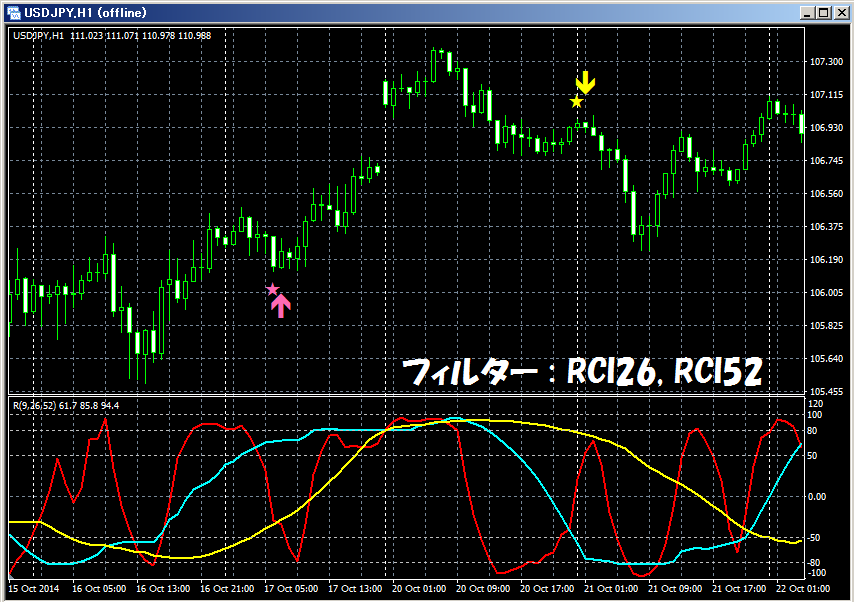
『RCI 3-line + mBDSR』~ Pay attention to support, example of lower timeframe bottom in the 1-hour chart ~“In a scenario where the 1-hour chart's RCI9 has fallen to the bottom zone and even lowered to the support line,” using the RCI three-line method to logically link higher and lower timeframes, the example explains how to think from the higher timeframe to the lower timeframe step by step, ultimately waiting for the timing to buy on pullbacks on the 5-minute chart (mBDSR sign).
58th accompanying bonus PDF【mBDSRhint58_20201013.pdf】
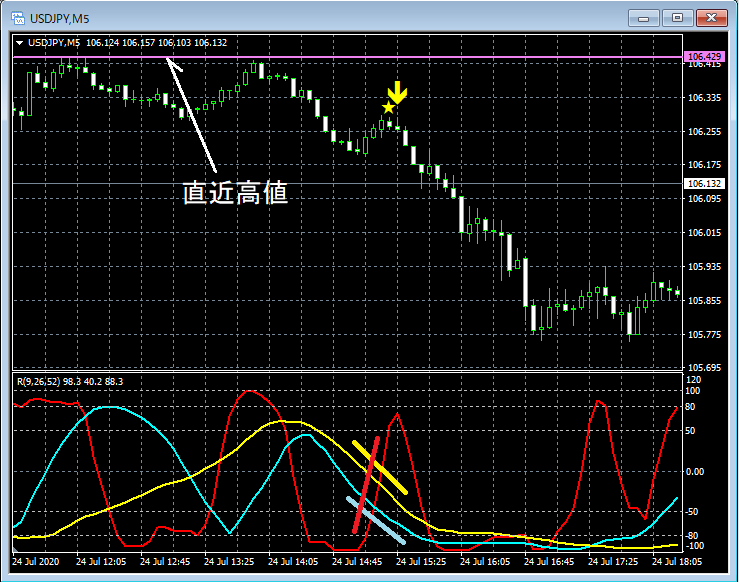
『RCI 3-line + mBDSR』 1-hour level pullback selling consideration, also focusing on moving averages“In a scenario focusing on moving averages and considering pullbacks at the 1-hour level,” using the RCI three-line method to logically link higher and lower timeframes, evolving to the timing to sell on rallies on the 5-minute chart (mBDSR sign).
59th accompanying bonus PDF【mBDSRhint59_20201013.pdf】
『RCI 3-line + mBDSR』~ 1-hour level pullback selling consideration, detailing to the 5-minute chart ~“In a scenario focusing on moving averages and considering pullbacks at the 1-hour level,” using the RCI three-line method to logically link higher and lower timeframes, ending with waiting for the pullback selling timing on the 5-minute chart (mBDSR sign).
60th accompanying bonus PDF【mBDSRhint60_20201014.pdf】
『RCI 3-line + mBDSR』~ 4-hour RCI9 bottom zone correspondence example, also noting the monthly EMA21 ~“In a scenario where the 4-hour chart's RCI9 is in the bottom zone,” using the RCI three-line method to logically link higher and lower timeframes, leading to the timing to buy on pullbacks at the 1-minute chart (mBDSR sign).
61st accompanying bonus PDF【mBDSRhint61_20201016.pdf】
『RCI 3-line + mBDSR』~ 1-hour double top scenario, also focusing on resistance ~
62nd accompanying bonus PDF【mBDSRhint62_20201018.pdf】
『RCI 3-line + mBDSR』~ Daily RCI9 ceiling zone adhesion example ~
63rd accompanying bonus PDF【mBDSRhint63_20201018.pdf】
『RCI 3-line + mBDSR』~ 4-hour RCI9 ceiling response, down to 15-minute chart ~
64th accompanying bonus PDF【mBDSRhint64_20201019.pdf】
『RCI 3-line + mBDSR』~ 1-hour RCI9 and RCI52 double bottom response ~
65th accompanying bonus PDF【mBDSRhint65_20201019.pdf】
『RCI 3-line + mBDSR』~ 1-hour RCI9 ceiling response, also watch the upper wick ~
66th accompanying bonus PDF【mBDSRhint66_20201023V1.pdf】
『RCI 3-line + mBDSR』~ 1-hour level pullback buying response, down to 5-minute chart ~
67th accompanying bonus PDF【mBDSRhint67_20201020.pdf】
『RCI 3-line + mBDSR』~ pullback buying after breaking above high from a pullback, using MA filter ~
68th accompanying bonus PDF【mBDSRhint68_20201020.pdf】
『RCI 3-line + mBDSR』~ 4-hour EMA21 breakout pullback buying example ~
69th accompanying bonus PDF【mBDSRhint69_20201020.pdf】
『RCI 3-line + mBDSR』~ pullback buying after breaking above high from a rally ~
70th accompanying bonus PDF【mBDSRhint70_20201020.pdf】
『RCI 3-line + mBDSR』~ breakdown of pullback lows to short selling ~
71st accompanying bonus PDF【mBDSRhint71_20201020.pdf】
『RCI 3-line + mBDSR』~ 1-hour EMA21 breakdown to rally selling response ~
72nd accompanying bonus PDF【mBDSRhint72_20201021.pdf】
『RCI 3-line + mBDSR』~ 1-hour level pullback buying, down to 5-minute chart ~
73rd accompanying bonus PDF【mBDSRhint73_20201021.pdf】
『RCI 3-line + mBDSR』~ How to deal when resistance tops out three times ~
74th accompanying bonus PDF【mBDSRhint74_20201018.pdf】
『RCI 3-line + mBDSR』~ 4-hour RCI9 ceiling response example, down to 15-minute chart ~
75th accompanying bonus PDF【mBDSRhint75_20201022.pdf】
『RCI 3-line + mBDSR』~ 4-hour double ceiling response example ~
76th accompanying bonus PDF【mBDSRhint76_20201022.pdf】
『RCI 3-line + mBDSR』~ 4-hour double ceiling response, down to 15-minute chart ~
77th accompanying bonus PDF【mBDSRhint77_20201023.pdf】
『RCI 3-line + mBDSR』~ 1-hour chart EMA21 pullback selling considerations ~
78th accompanying bonus PDF【mBDSRhint78_20201023.pdf】
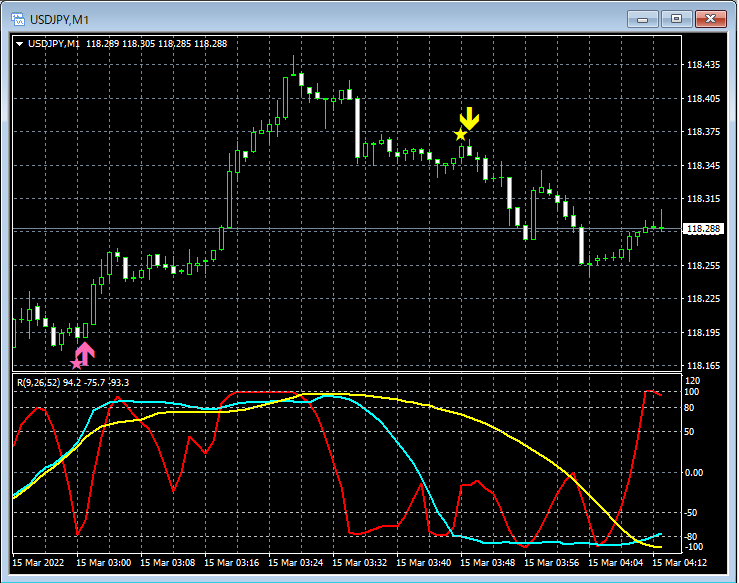
『RCI 3-line + mBDSR』~ 1-hour level pullback buying, down to 1-minute chart ~
79th accompanying bonus PDF【mBDSRhint79_20201023.pdf】
『RCI 3-line + mBDSR』~ About 1-hour 3-peak ceiling response ~
80th accompanying bonus PDF【mBDSRhint80_20201023.pdf】
『RCI 3-line + mBDSR』~ Pay attention to monthly resistance, example of pullback selling ~
Indicator that shines in combination with RCI: BODSOR・mBDSR
https://www.gogojungle.co.jp/tools/indicators/11836
※ An indicator developed to improve entry accuracy when using the RCI three-line method for buying on pullbacks and selling on rallies
There are 80 bonus PDF files included. that link higher and lower timeframes logically using the RCI three-line method, sequentially considering the conditions of multiple lower timeframes, and ultimately waiting for the timing to buy on pullbacks or sell on rallies at the lower timeframe (the = mBDSR sign) is extensive.