
The 3rd Episode: Thoroughly Analyze Charts from Candlesticks — Area Method Explanation — [FX Planner]

In the previous explanation, I think you understood that it is crucial to find the levels that large players do not want to be taken out of by watching the movement of candlesticks. Building on that, this time we’ll touch on the core of the “area” that is central to the area method.
[The Essence of the Area Method Practical Edition FX Planner]
・Chapter 1: How to find high-advantage areas from charts(Available for free)
・Chapter 2: Thoroughly analyze the chart from candlesticks
・Chapter 3: Thoroughly analyze the chart from candlesticks ~ Area Method Explanation ~
・Chapter 4: How to think about and decide the acceptable range
・Chapter 5: How to use the established acceptable range with the area method
・Chapter 6: How to narrow the area’s price range down to the acceptable range
・Chapter 7: What to do before and after entry
・Chapter 8: Corrections to the area and decision criteria
【Related Articles】
・Essentials of Technical Analysis | Chapter 1: Grasp the psychology of buyers and sellers [FX Planner]
Table of Contents for Chapter 3
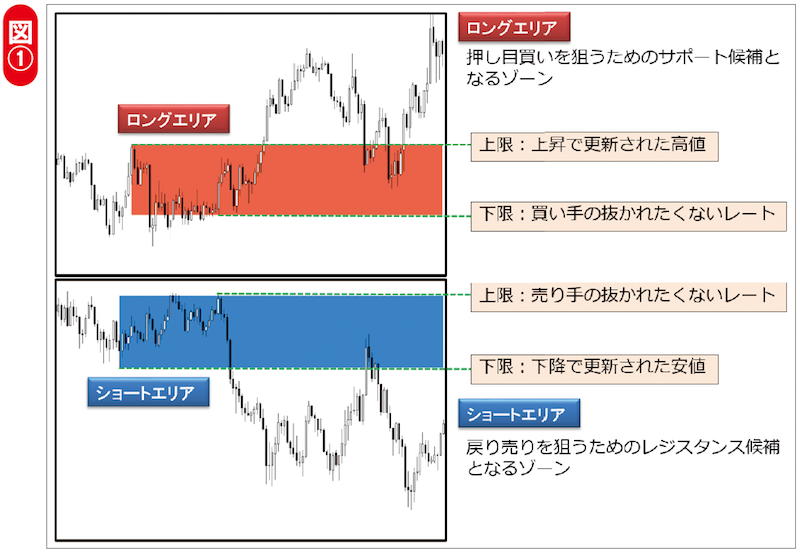
1. There are two types of areas used for entry
2. The price you don’t want to be taken out of becomes the lower bound of the area
3. The definition of the upper bound of the area and the reasons for deciding it
There are two types of areas used for entry
Last time, I explained the “rates that large players do not want to be taken out of,” created by ultra-wealthy investors, funds, and institutional investors (hereafter referred to as the large players), which move the market significantly. This “rate you don’t want to be taken out of” is one of the most important rates in the area method and also serves as the basis for stop-outs. And from here, I would like to tell you what exactly an “area” is and how best to use it.