
How to correctly draw trendlines and tools that support drawing lines
Which is the correct trendline?
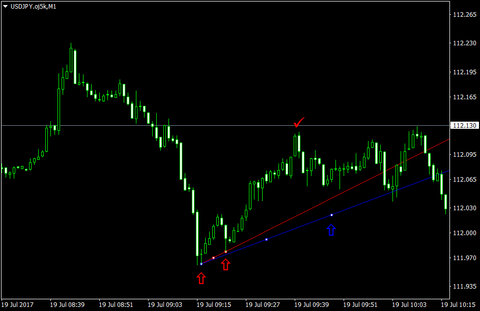
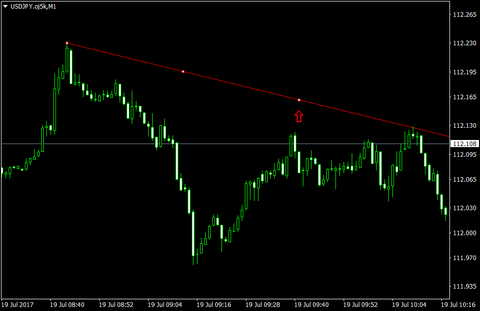
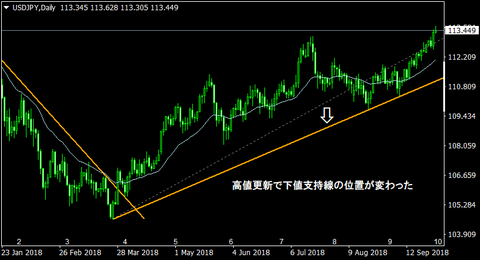
Abruptly speaking, among the two trendlines in red and orange in the figure below, which line do you think is regarded as the correct one by many traders?
The correct answer is the orange line.

However, the red line is not necessarily wrong, and in the time zone where the highest price on the right edge does not rise and the second-highest price becomes the highest (between yellow arrows a–b), the red line is also a correct trendline.
How to draw trendlines correctly
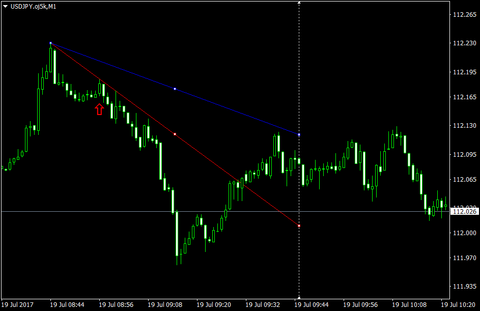
★ For a lower support line, connect the lowest price that serves as the starting point of the wave with the highest price before the peak.★ For an upper resistance line, connect the highest price that serves as the starting point of the wave with the highest price before the trough.

In the example above, as long as 3 is the highest price, you can draw a trendline by connecting the starting point and the low of 2.
After breaking above the high of 3, the trendline becomes the line connecting the starting point and the lowest price between the highs of 3–5.
This tool has a function to automatically adjust the trendline according to the correct drawing method described above.
How the line updates automatically
We have captured a video showing the line automatically updating, so please take a look.What happens in the automatic adjustment of lines
The automatic line adjustment of this tool has two patterns.
[POS] Adjustment method determined by the time of the second pivot point
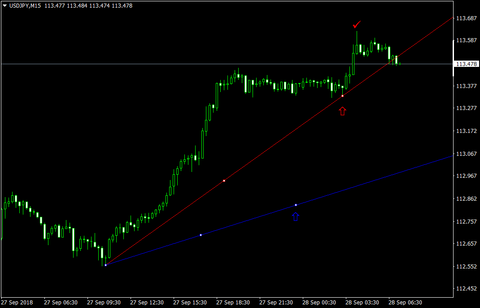
- For a lower support line
- Adjust to a trendline that connects two lows earlier than the highest price candle between the starting point and the next point.
- As in the following example, when you manually draw the blue line, the system looks for the red check mark of the highest price between the starting point and the blue arrow, finds the two lows before the red check mark, and automatically adjusts so that the line between the two lows does not intersect the candles, resulting in a red line.
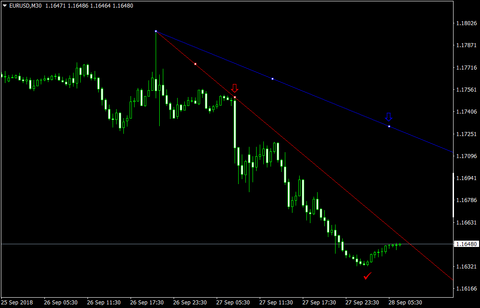
- For an upper resistance line
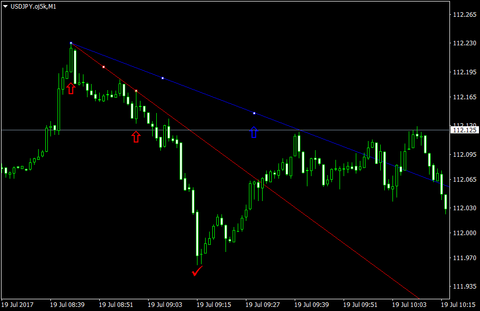
- Adjust to a trendline that connects two highs before the lowest price candle between the starting point and the next point.
- As in the following example, when you manually draw the blue line, the system looks for the red check mark of the lowest price between the starting point and the blue arrow, finds the two highs before the red check mark, and automatically adjusts so that the line between the two highs does not intersect the candles, resulting in a red line.
※If the second point price is higher than the starting price, it is identified as a lower resistance line; conversely, if the second point price is lower than the starting price, it is identified as an upper resistance line.
If you want to re-run automatic adjustment, move the second-point peak shown by the red arrow in the figure below.
According to the position you move to, it will automatically search for the highest/lowest candle and redraw the line accordingly.
If the parameter "Extend the line" is not checked in the trendline parameters, the line will be adjusted to connect the two points you moved, and the second point will not become the highest/lowest peak.
In other words, as in the figure below, if you manually draw the blue line, the second point is adjusted so that the red arrow becomes the next peak after the starting point when you release the line on the time axis.
[Time] Automatically determine the second pivot point at every candle close
- For a lower support line
- Adjust to a trendline that connects two lows earlier than the highest price candle up to the current time from the starting point.
- As in the following example, when you manually draw the blue line, the system looks for the red check mark of the highest price up to the current time, finds the two lows before the red check mark, and automatically adjusts so that the line between the two lows does not intersect the candles, resulting in a red line.
- For an upper resistance line
- Adjust to a trendline that connects two highs before the lowest price candle up to the current time from the starting point.
- As in the following example, when you manually draw the blue line, the system looks for the red check mark of the lowest price up to the current time, finds the two highs before the red check mark, and automatically adjusts so that the line between the two highs does not intersect the candles, resulting in a red line.
If you set "Keep the original line" to true after a high/low update, you can preserve the original line when the line position changes due to automatic updates.
However, when the line is selected, the function to preserve the original line is disabled (to prevent the user from leaving an old line while adjusting the line).
Example of line position updating
Thus, this has been an introduction to the standout feature of the Line Assist Tool: automatic line adjustment.
I hope it aids your discretionary trading.
× ![]()