
[Amida-type: Master the Market with Volume Profile] Lesson 23: Volume Setup #3 (Rejection Setup) Rejection Setup – A Strong "Rejection" Signal
"When the market clearly tells you 'No'—listen to that voice and act decisively."
1. Knowledge Coordination
Until now, we have explored the following strategies based on volume profile.
Lesson 21: High-Volume Concentration Setup – A strategy to identify volume accumulation areas in a ranging, stagnant market.
Lesson 22: Trend Setup – By identifying volume concentration areas (AOC) within an ongoing trend, we broaden our trading range.
However, markets do not always move smoothly. Sometimes at a specific price level, price reacts very strongly and abruptly. This suggests a decisive "rejection" from buyers or sellers.
So, how can we recognize the overwhelming power of these “rejection” signals and quickly and effectively translate them into entries?
2. Rebound Setup – What is a “Powerful Rejection Signal”?
The “Rejection Setup” is a trading strategy focusing on the following points.
Identify price zones or specific levels where the market is showing an extremely strong “rejection.” This rejection is through the combination of price action and volume.
Enter immediately after the rejection signal is confirmed, expecting a strong reversal or continuation of the trend.
The core idea of this strategy:
A Rejection Setup is about reacting quickly and decisively when the market clearly rejects a price level or range. This is the moment when large capital shows its power, and we seek to ride that momentum.
3. Three Steps to Find the “Rejection Setup”
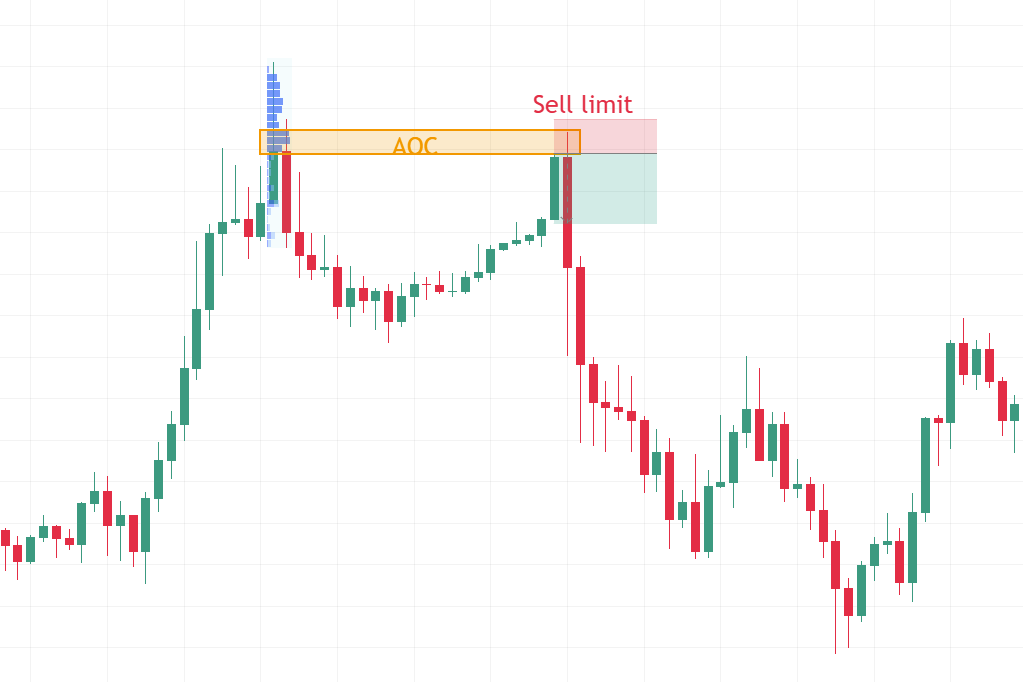
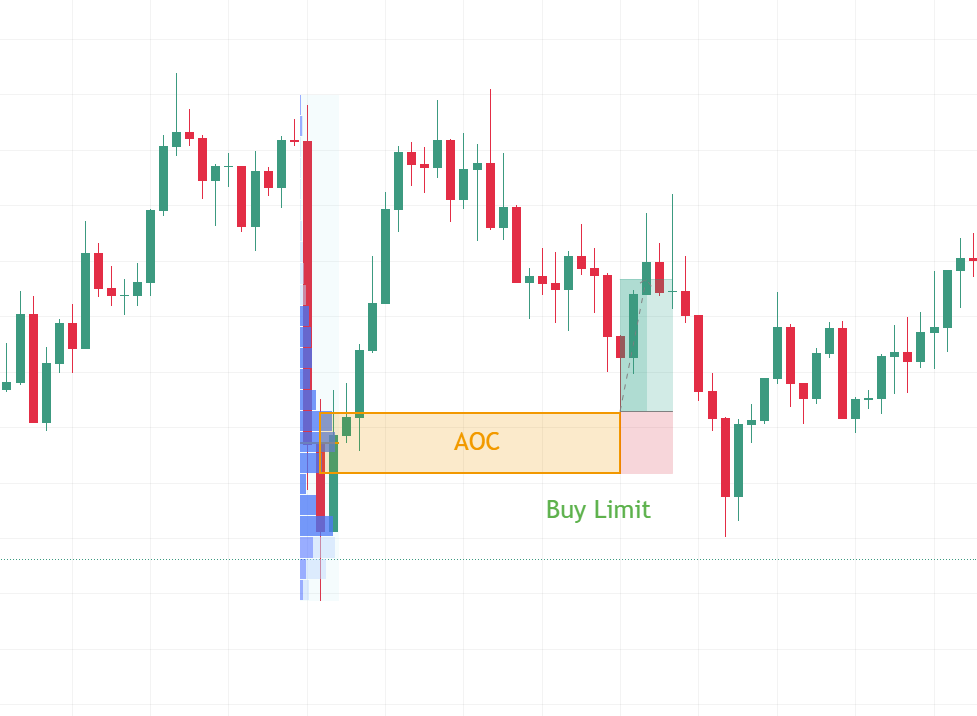
1: Identify the area where price is rejected First, look for candlestick patterns on the chart that clearly show price rejection.
Pin Bar: A candlestick with a small body and a very long wick, indicating strong price rejection.
Engulfing Bar: A large candlestick that completely engulfs the previous one, signaling a strong reversal.
These signals typically appear at key levels such as existing support/resistance, POC, or AOC.
2: Measure the rejection area with the Volume Profile Apply the Volume Profile tool to the rejection candlestick(s). The goal is to identify the concentration of volume within the rejected area. This appears as POC (Point of Control) or AOC (Area of Control).
3: Place a Limit Order Once you’ve identified a zone where volume is concentrated within the rejection area, place a limit order at that price. This allows you to enter at a more favorable price when price returns to that zone.
When placing a Buy Limit order: If price rejection is downward (long lower wick pin bar or bullish engulfing).
When placing a Sell Limit order: If price rejection is upward (long upper wick pin bar or bearish engulfing).
Trading the Rejection Setup
Let’s see how to bring this setup into your trading.
Entry Point (Buy Limit / Sell Limit): After identifying the zone where rejection volume is concentrated (POC/AOC), place a limit order in that price range.
If rejection is downward (buy order): Place a Buy Limit order in the POC/AOC region measured within the rejection candlestick.
If rejection is upward (sell order): Place a Sell Limit order in the POC/AOC region measured within the rejection candlestick.
Stop Loss: Set the stop loss just outside the wick of the rejection candlestick. This position is a logical point to quickly limit losses if the market moves against your view.
Take Profit: Set the risk-reward ratio (RR) from 1:1.5 to 1:2. Also target the next major POC, AOC, or a key support/resistance level.
4. Why is the Rejection Setup an “Extremely Powerful” Signal?
The reasons this strategy is especially effective are as follows.
Reflects smart money intervention directly: When volume spikes with a strong “rejection” candlestick, it indicates large institutions pouring in capital to defend a price level or reverse the trend.
Clear and immediate signal: Rejection setups typically provide a clear entry point right away.
Attractive risk-reward ratio: Because the stop loss sits just outside the wick, risk is tightly controlled.
High reliability at important areas: When appearing at strong support/resistance, POC/AOC, or other crucial Fibonacci levels, the signal’s reliability increases dramatically.
✅ Conclusion
Rejection Setup – A powerful signal of a decisive “rejection” from the market and a crucial strategy to act quickly based on that signal.
By combining price action and volume, identify the market’s resolute “rejection,” and you can capitalize on the market’s strong rebound potential and participate in potentially large price moves.
? In the next lesson (Lesson 24), we will identify the “gaps” in the volume profile and explore a “Volume Gap Setup” that takes advantage of the market’s tendency to “fill in” these gaps.
See you in the next lesson!