
One-Click FX Arrows Support Page
This page is a support page for purchasers.
※This is publicly available for everyone, including those considering a purchase. Please review the product features and how to use them in detail. If you have any questions, please feel free to contact us.
If you are considering purchasing the product, you can purchase from here.
https://www.gogojungle.co.jp/tools/indicators/64130The latest version is 1.04.250713.
Upgrades for purchasers are free ⇒Download Center
※By downloading or launching this product, you agree to the Terms of Use.
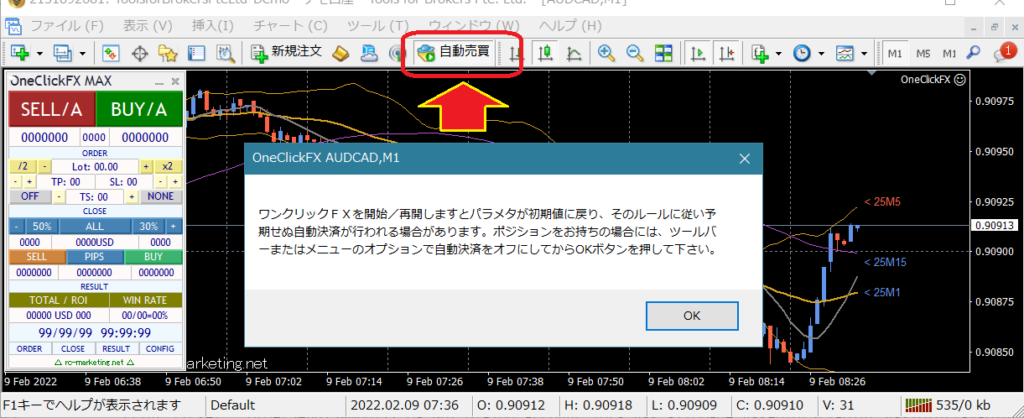
This tool automatically places orders according to your settings. Before using it in a live environment, be sure to test thoroughly with a demo account (or make small trades). Also, immediately after startup, orders may be placed automatically according to the settings, so please turn off the automatic trading button in MT4 or the algorithmic trading button in MT5, and verify the situation before turning it on.
Initial Release
※This page also includes images of the version before the upgrade
Product Contents
Your signal tool becomes an automatic trading EA.
“One-Click FX Arrows” is a signal-linked auto-trading tool that automatically enters and closes trades using the arrows from your signal tool.
It supports both Buffer Output type and Object type signals, and by combining with theSignal Arrowization Tool, almost all signal tools can be made compatible with automated trading (some specialized tools are excluded).
Also, the buffer type supports MT4 optimization, enabling you to run optimizations that adjust stop-loss lines and trailing stop settings.
Installation & Setup
We will explain installation, environment configuration, and startup methods.
■Initial Setup
Refer to the setup page to allow DLLs, configure authentication, and install One-Click FX Arrows.
Basic setup for the One-Click FX seriesAfter completing the setup, please restart MT4.
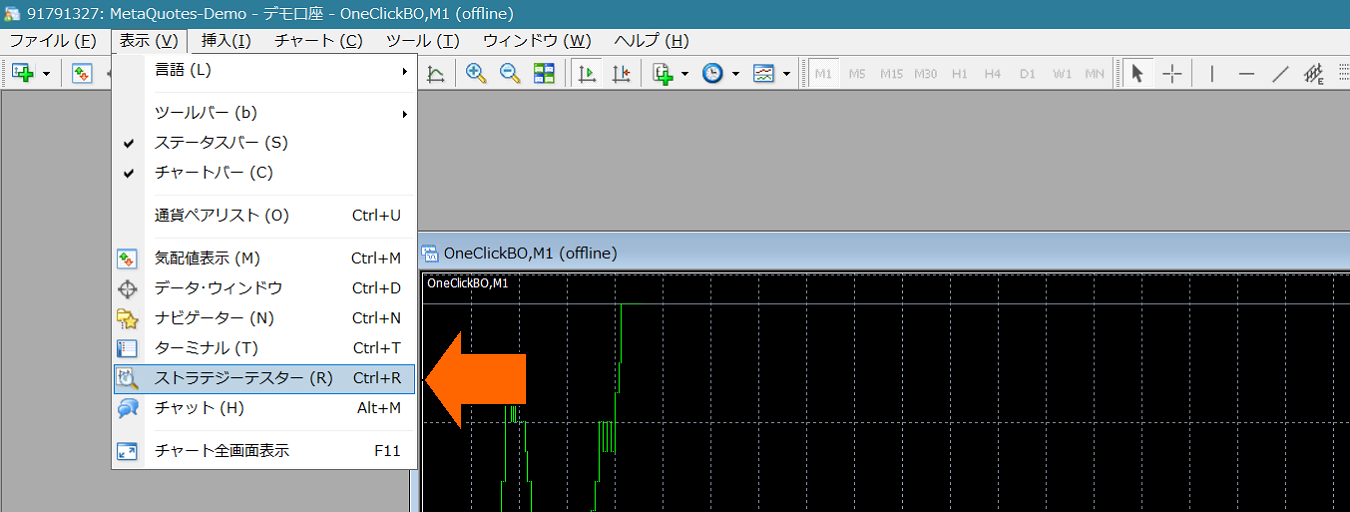
■Launching in Strategy Tester
1) Open the Strategy Tester window.
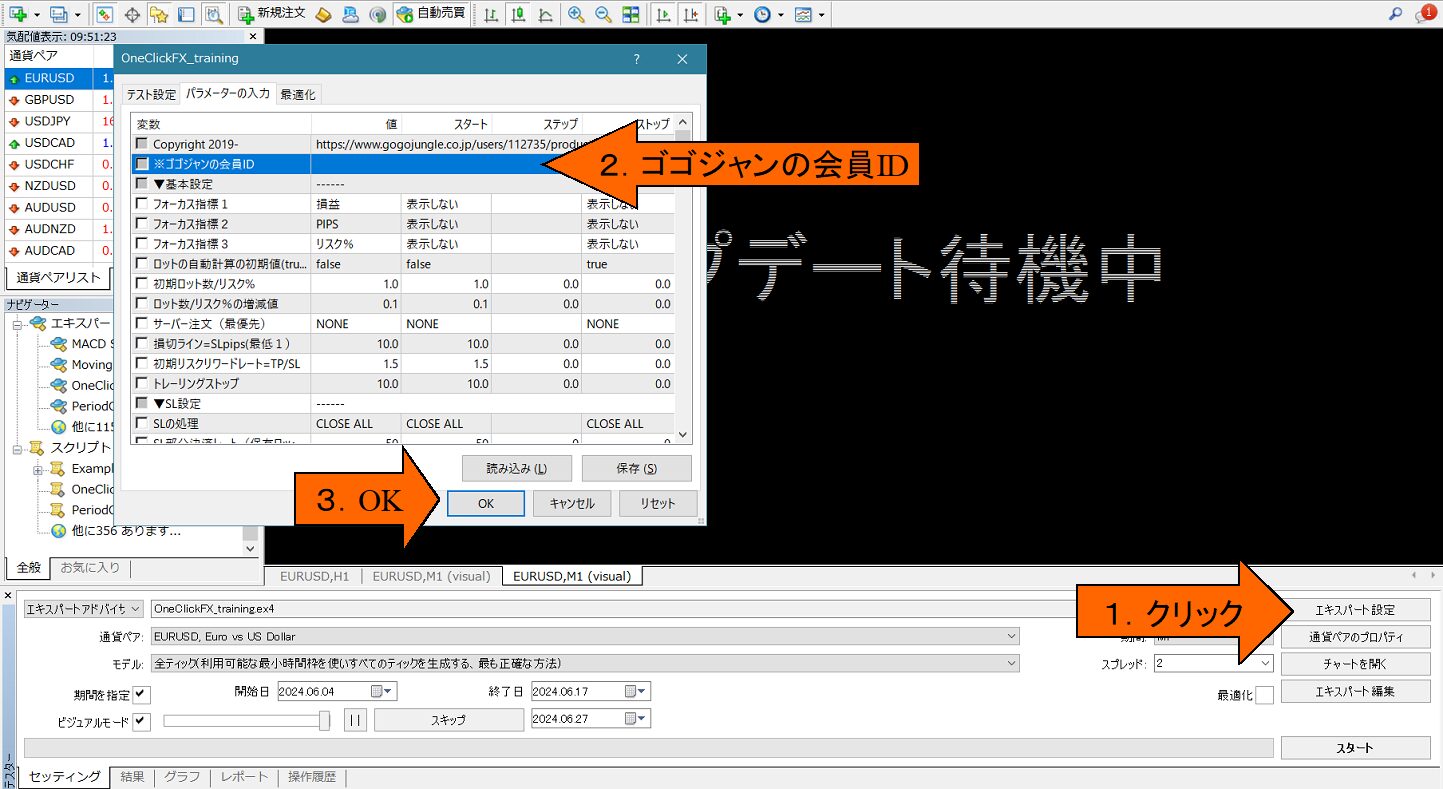
2) From Strategy Tester, select Expert "OneClickFX_arrows", any currency pair,Model is "Control Point" (practice like scalping uses every tick)Check Visual Mode, uncheck Optimize. Raise the speed slider to 31 or 32.

If Visual Mode is not displayed, see here⇒If Visual Mode, speed slider, period do not appear in MT4 tester.
3) [Important] In Expert Settings,Open the input parameters screen and enter your GoGoJungle member ID, then OKand press. (Other parameter information will be described later). If authenticated with another address, it may be regarded as improper use.If you authenticate using the One-Click FX Downloader, you do not need to enter your email address.
4) Click the Start button in the bottom-right of the tester window (in the image, the Stop button).
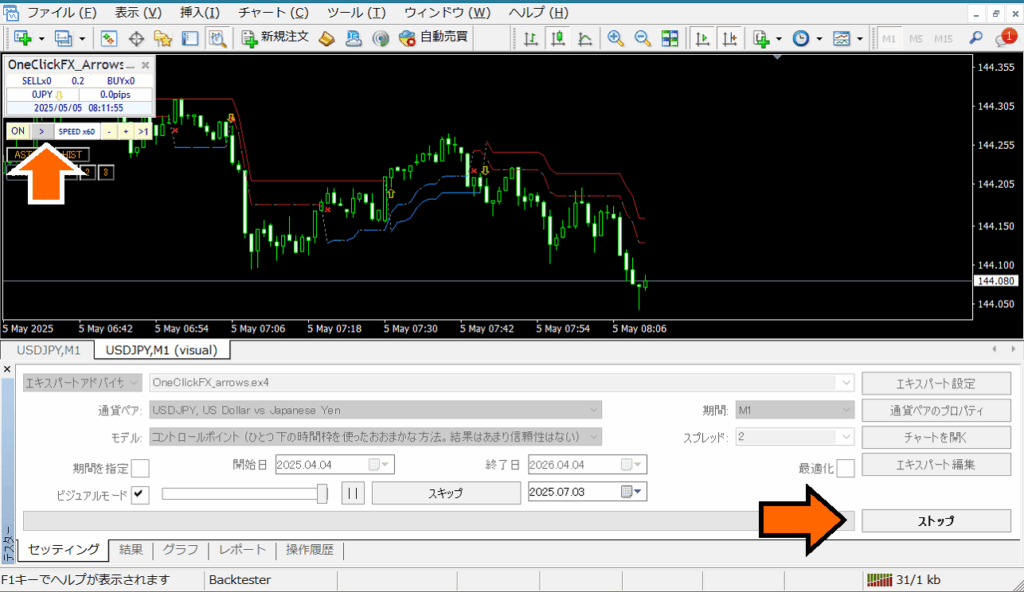
After showing "Waiting for update" the chart screen will appear. If a license error occurs, please review your email address. Press Stop to halt. From the One-Click FX Arrows control panel on the chart, press the pause button at the arrow area and then start again.
This will operate with the default settings. First, add the includedOne-Click Auto Arrow Trading [AutoArwTrade]compatible indicators to the chart and verify the operation.
If it stops immediately after startup, please check the error items in the history tab
Standard charts in tester
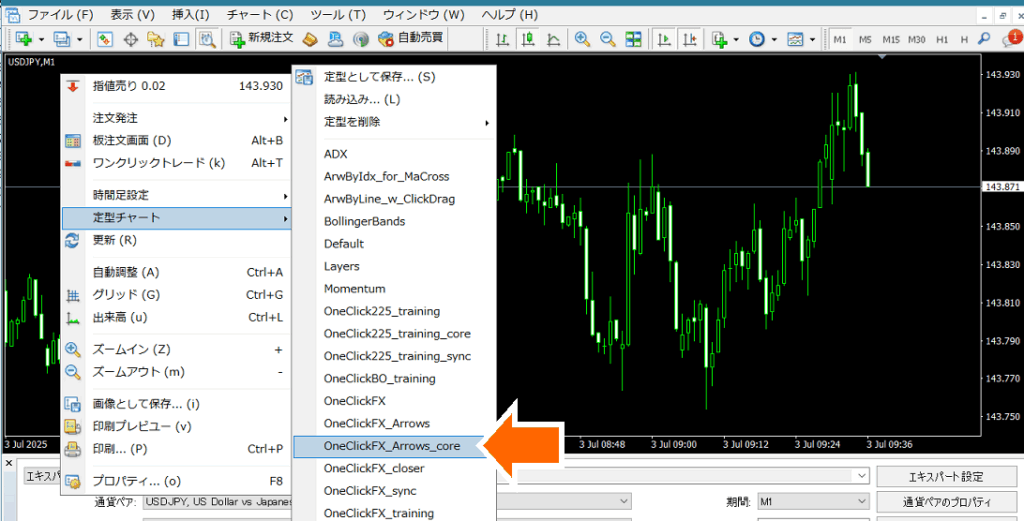
There are three standard charts included.
・OneClickFX_arrows: A standard chart automatically applied at startup. It includes the original chart colors, Bollinger Bands, moving averages, PipsGrid, and Japan time display indicators.
・OneClickFX_arrows_core: Simple content with original chart colors and Bollinger Bands only.
In addition to the above, you can freely change to your own standard charts or right-click -> Standard Chart to customize.

Make Funds in Japanese Yen
From the Expert button, open the test settings and in the right side of the initial capital dropdown list, directly enter "JPY". Leaving it as is will reduce funds, so add two zeros.
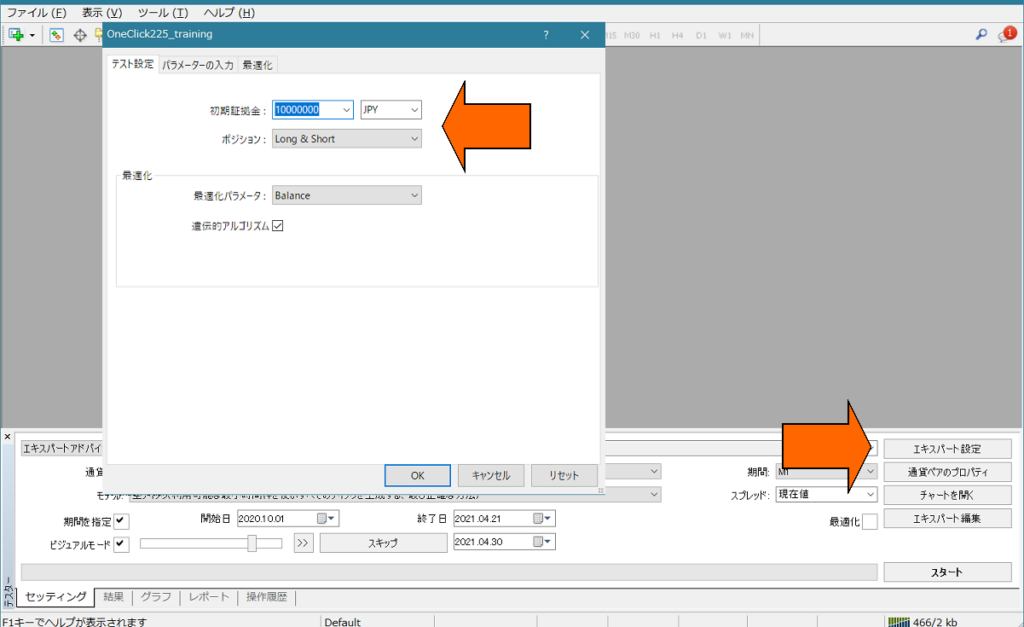
Depending on the broker, orders may stop immediately if the currency pair is not JPY. In that case, please set the capital to match the currency pair you are using.
For details ⇒Set the base currency of MT4 Strategy Tester to Japanese Yen
■Launching on Online Charts
1) Open any online chart.
2) From the standard chart, select “OneClickFX_arrows”.
First, add the includedOne-Click Auto Arrow Trading [AutoArwTrade]compatible indicators to the chart and verify the operation.
Operation & Parameter Settings
■How to Use
Main Panel※ On online charts, the speed control and below are not displayed.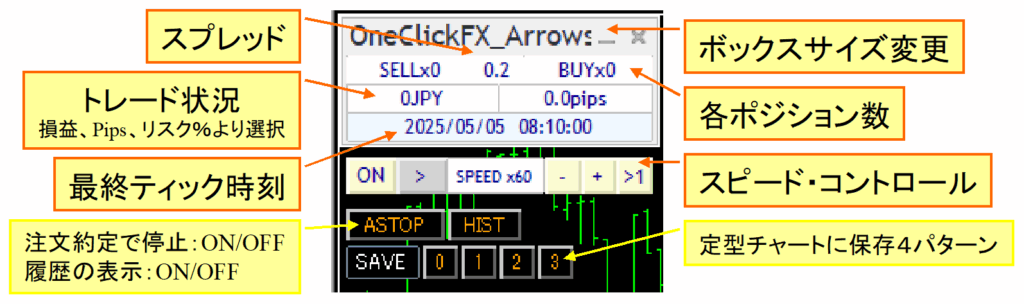
Focus Mode
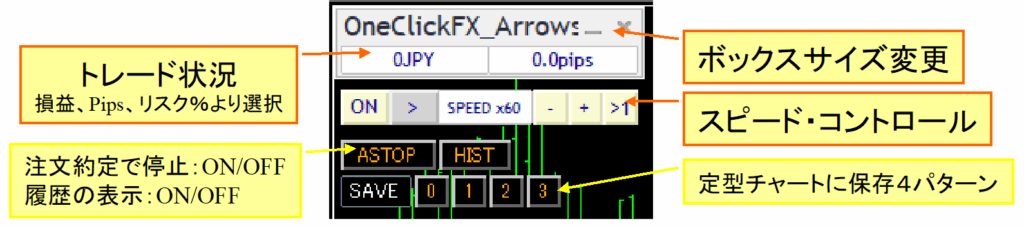
Speed Control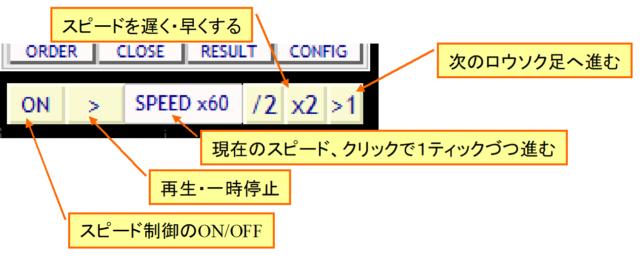
■Parameter Settings
| Parameter | Details |
|---|---|
| GoGoJungle Member ID | Enter your GoGoJungle member ID for license authentication. Only purchasers may use it. |
| Magic Number | You can set a magic number arbitrarily. The default 0 applies to all trades. |
| Focus indicators 1, 2, 3 | You can select three indicators: Profit/Loss, PIPS, Risk % for each. Indicator 1: left of the control box, Indicator 2: right of the control box, Focus Mode, Indicator 3: center at the right edge of the chart (NONE to hide) |
| Initial Lot Size | |
| SL line = SLpips (minimum 1) | Specify the initial PIPS from the order price to the stop loss line. This value does not include the spread. The take-profit stop will be this value plus the spread. |
| Risk Reward | Specify how many times the difference between the order price and the stop loss is used to set the initial take-profit. If SL is 100 and Risk-Reward is 1.5, the initial TP is (100 pips + spread) × 1.5 from the break-even line. |
| Trailing Stop | Trailing Stopis automatic trailing exit controlled by the tool. Specified in pips. |
| ▼ SL Settings (Stop-Loss) | |
| Type of SL Trailing Stop | Trailing StopChoose the type. |
| ▼ Individual Settings | |
| Maximum Number of Positions | Limit the maximum number of positions that can be entered. Depending on the broker there may be a cap. Zero means unlimited. |
| Maximum Size per Position (Zero = unlimited) | Automatically split the order size for entries. |
| Use ASK Line | Emulate the BID line with the ASK line. If false, adjust for spread and display a pseudo line as usual. Note: large spread fluctuations may introduce errors. |
| Permissible Slippage | Specify the acceptable slippage in points. |
| PIPS=>Points Conversion Coefficient | Specify the numeric value to convert PIPS to points. As long as used in FX, zero is fine. For CFDs, numbers vary by broker; adjust accordingly. |
| ▼ Speed Settings | |
| Starting Speed Index | Specify which speed in the Speed Control List to start at. |
| Speed List | Specify speed multipliers as a comma-separated list. 60 means 1 second = 1 minute, 3600 means 1 second = 1 hour, up to a maximum of 604800 (7 days). In practice, results may vary based on computer performance and processing. |
| ▽ Display Settings | |
| Show Final Time | Display the final tick time in the control box. If server time is offset, the adjusted time is shown. |
| Trade Image Saving Image Size (Width x Height) |
Set how image capture is done at execution and daily summaries. After tester ends (press Stop, etc.), open the saved image folder. In the tester, images are overwritten each run, so copy to another location if needed. On online charts, saving continues indefinitely. |
| InitialAllowance for Buy Signals InitialAllowance for Sell Signals InitialAllowance for Close Signals |
|
| Buy Signal Object Name Sell Signal Object Name |
Enter the object names that signals display. If there is partial match, it is considered a target signal. Defaults: ArwUP, ArwDN are fromOne-Click Auto Arrow Trading and the includedSignal Arrowization Tool arrow defaults.Multiple strings can be specified with commas. All conditions are ANDed. |
| Signal Time Target | Specify whether the signal targets the latest bar (0) or past bars (1 and up). If repainting occurs on the latest bar, enter the confirmed previous bar (1). |
| All Close Signals Object Names Buy Close Signal Object Name Sell Close Signal Object Name |
Enter the object names displayed by the signal tool. If partially matched, it is treated as the target signal. Defaults: ArwCL, ArwCUP, ArwCDN are fromOne-Click Auto Arrow Trading and the includedSignal Arrowization Tool arrow names. |
| Close Signal Time Target | Input whether the target is the latest bar (0) or past bars (1+). If repaint on the latest bar, enter the confirmed previous bar (1). |
| Buy Signal Index Sell Signal Index |
|
| Indicator Parameters 1-8 | |
| Notification Settings [Common] | |
Details of Features
■Flexible Trailing Stop - FlexiTrail Stop -
From the "▼ Basic Settings" for Trailing Stop, you can choose the trailing stop type.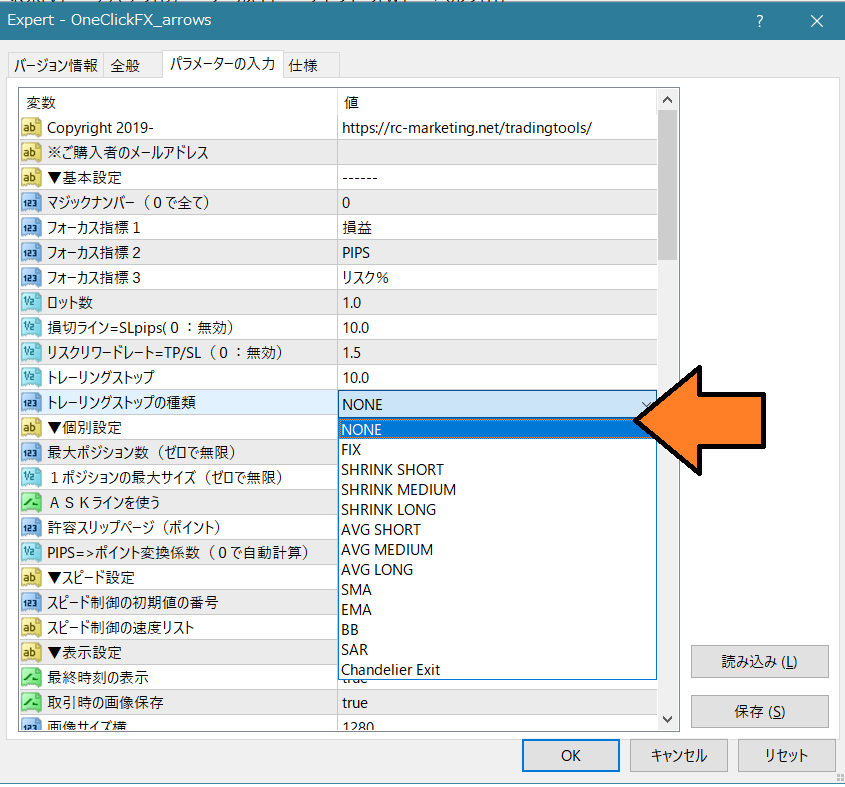
The trailing stop line is shown in purple when you hold a position.
・None: NONE
Trailing stop is not used.
・Fixed: FIX
From the moment it is ON, closes when the high price falls below the specified value. It behaves like a standard trailing stop.
・Shrink: SHRINK SHORT, MEDIUM, LONG
Similar to FIX, but on each price update or tick, compare highs and if not updated, move the take profit closer. If highs update, return to the specified value.
For SHRINK SHORT, if there is no high update for about 100 ticks, it closes on a tie. MEDIUM and LONG close after more updates without a high. If the high updates, those values reset to the initial value.
If there is a sharp drop after a high, trailing may lag, but there is leeway before the close, allowing a potential rebound.
・Average: AVG SHORT, MEDIUM, LONG
Starting from the value at ON and the parameter value, add the current value on each price update or tick to compute the average. Shorter averages track faster; longer averages track slower. AVG has no reset and tends to close earlier than FIX or SHRINK, remaining responsive to price moves. It responds quickly to large price changes and closes decisively.
・Moving Average (MA)
Close when touching the moving average line of the specified period. Closes when the trend changes. T/S value is the period of the moving average (e.g., MA20).
・Bollinger Bands (BB)
Close when touching either band of the Bollinger Bands for the specified period. For a long, touch the lower band; for a short, touch the upper band. Like MA, T/S is the period (MA20, etc.). Deviation 2 is fixed and cannot be changed.
・Stop & Reversal Point (SAR)
Close when touching the Parabolic SAR with the specified step. Parabolic SAR by J. Welles Wilder signals trend reversals. T/S is in 1/1000 increments. Default 10 means 0.01. 1 means 0.001. Use the standard Parabolic SAR in indicators to verify values.
・Chandelier Exit
Chandelier Exit uses ATR (Average True Range) to widen stops in volatile markets and tighten them in calm markets, staying with the trend while avoiding excessive profit-taking or stop-outs. T/S value is a multiple of 1/10 and ATR period is fixed at 14.
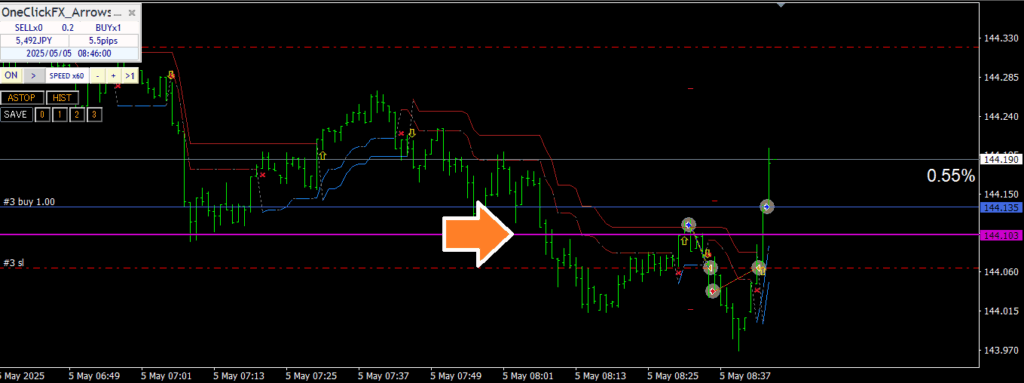
In this sample video,One-Click FX Training MAXis used to compare a typical fixed trailing stop with Shrink L. Both follow new highs, but Shrink adjusts the close line toward the current price when highs no longer rise.
■Speed Control
The Speed Control at the bottom of the control box can be increased or decreased by the value entered in the parameter "Speed Control Speed List".
Clicking the "SPEED" area advances one tick, and the rightmost " >1 " button moves to the next candle and stops at the first tick after switching.
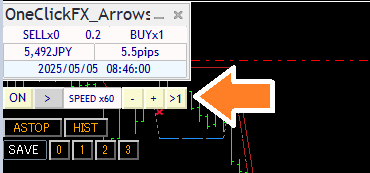
The speed specified by SPEED ranges from 1x (1 second = 1 second) up to 604800x (7 days). In practice it will not exceed the maximum speed of the Strategy Tester. If speed control is OFF, the speed in the tester is used (maximum playback speed).
Also, performance depends on your PC and the indicators and signal linkage in use; to use Speed Control smoothly, move MT4's speed gauge all the way to the right (fastest) before using.
■Auto Image Saving
If Auto Save Images is true, chart images are saved automatically on order and exit.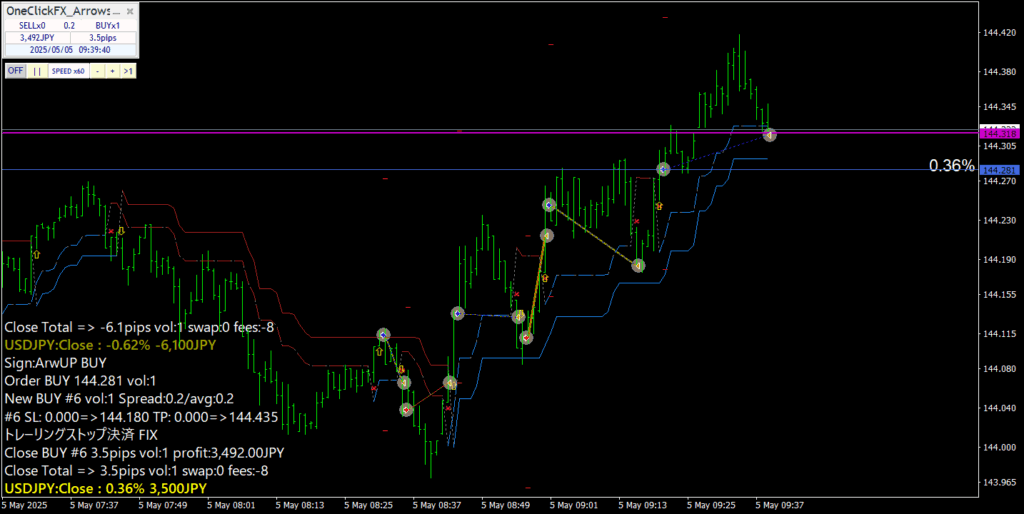
Saved images are in the data folder under tester/files/Export4AI.
Saved image files are overwritten each time the tester starts, so copy to another location if you wish to keep them. On online charts, images are saved continuously.
■AI Judgment (AI Export)
When running in the tester's visual mode, at the end of the test, trade data is exported for AI. Loading the exported data into AI allows evaluation and exploration by AI.
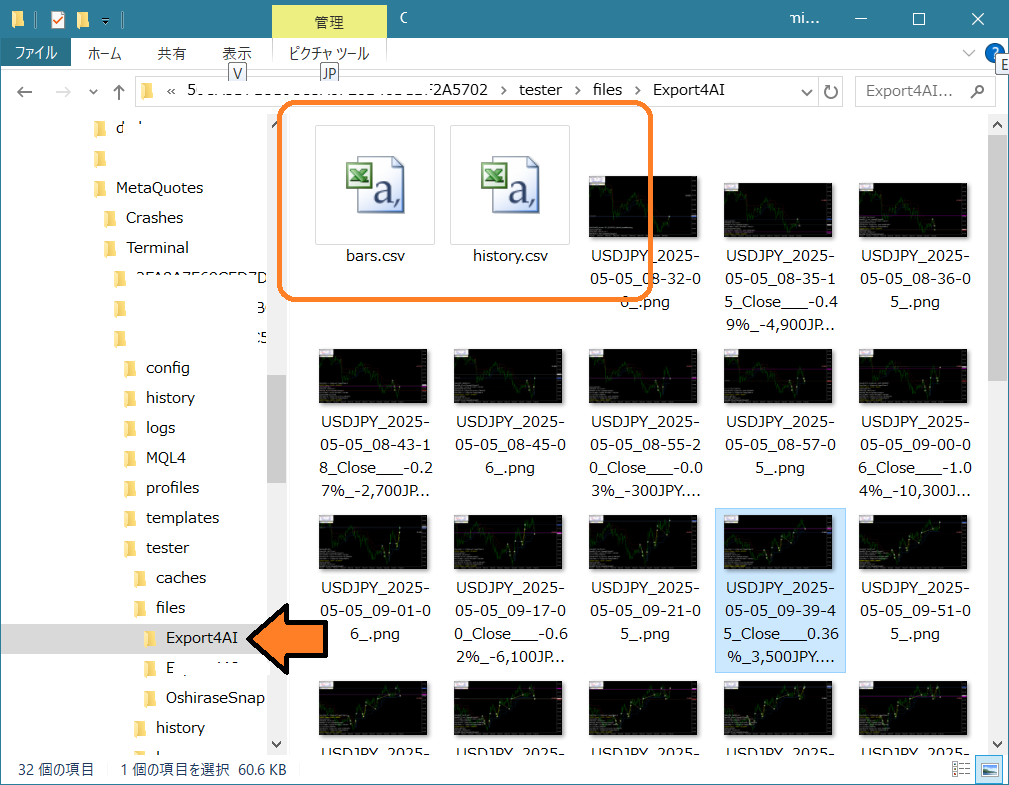
The AI Judgment CSV file is always output; enabling Auto Image Saving shows the save folder at the end. Upload this CSV file to various generative AIs for use.
Even free AI can work (though with limitations).From the clip icon, please upload the file.

When the upload completes successfully, it will be displayed.

If you succeed in loading data into the AI, try asking a variety of questions.
For example:
“Evaluate and analyze the trading content,” “I entered on a moving average cross; is this correct?”, “Plot on the chart and add 75 moving average,” “Tell me what caused a large loss and how to avoid it,” “what score would you give?”
AI responses vary from appropriate to completely off-base or unintended. Also, consider whether the content is really correct. Treat it as one opinion among many.
To elicit better answers, ask specific questions. For example, asking “How to win in FX” will yield generic good-but-vague responses. Be more specific about what you want to do. Just as you would feed trading data to AI, you should also share your own information with AI.
As a reference,One-Click FX Trainingprovides sample data.
ai_ssample01、ai_sample02、ai_sample03
※These samples are generated with ChatGPT Plus.
Fortunately, AI does not get angry if you ask the same question repeatedly. If you don’t understand something, ask again. Sometimes it may be impossible, but it will almost always provide some answer. It’s fine to push for more. If you provide correct information, it will tailor its answers. If you only get generic answers, provide more specific information and be precise in your requests.
※ If you’re using a free AI for analysis, loading only history.csv reduces the amount of analysis and allows for longer conversations. If deeper analysis is needed, consider the paid version.
Notes: AI analysis requires Free AI (perplexity.ai, wrtn.jp, ChatGPT) or ChatGPT Plus (monthly $20); AI Judgment is a tool for analyzing trade results and does not provide investment advice. The data and analysis results are for reference only and do not guarantee all future results. Please make final investment decisions at your own risk.
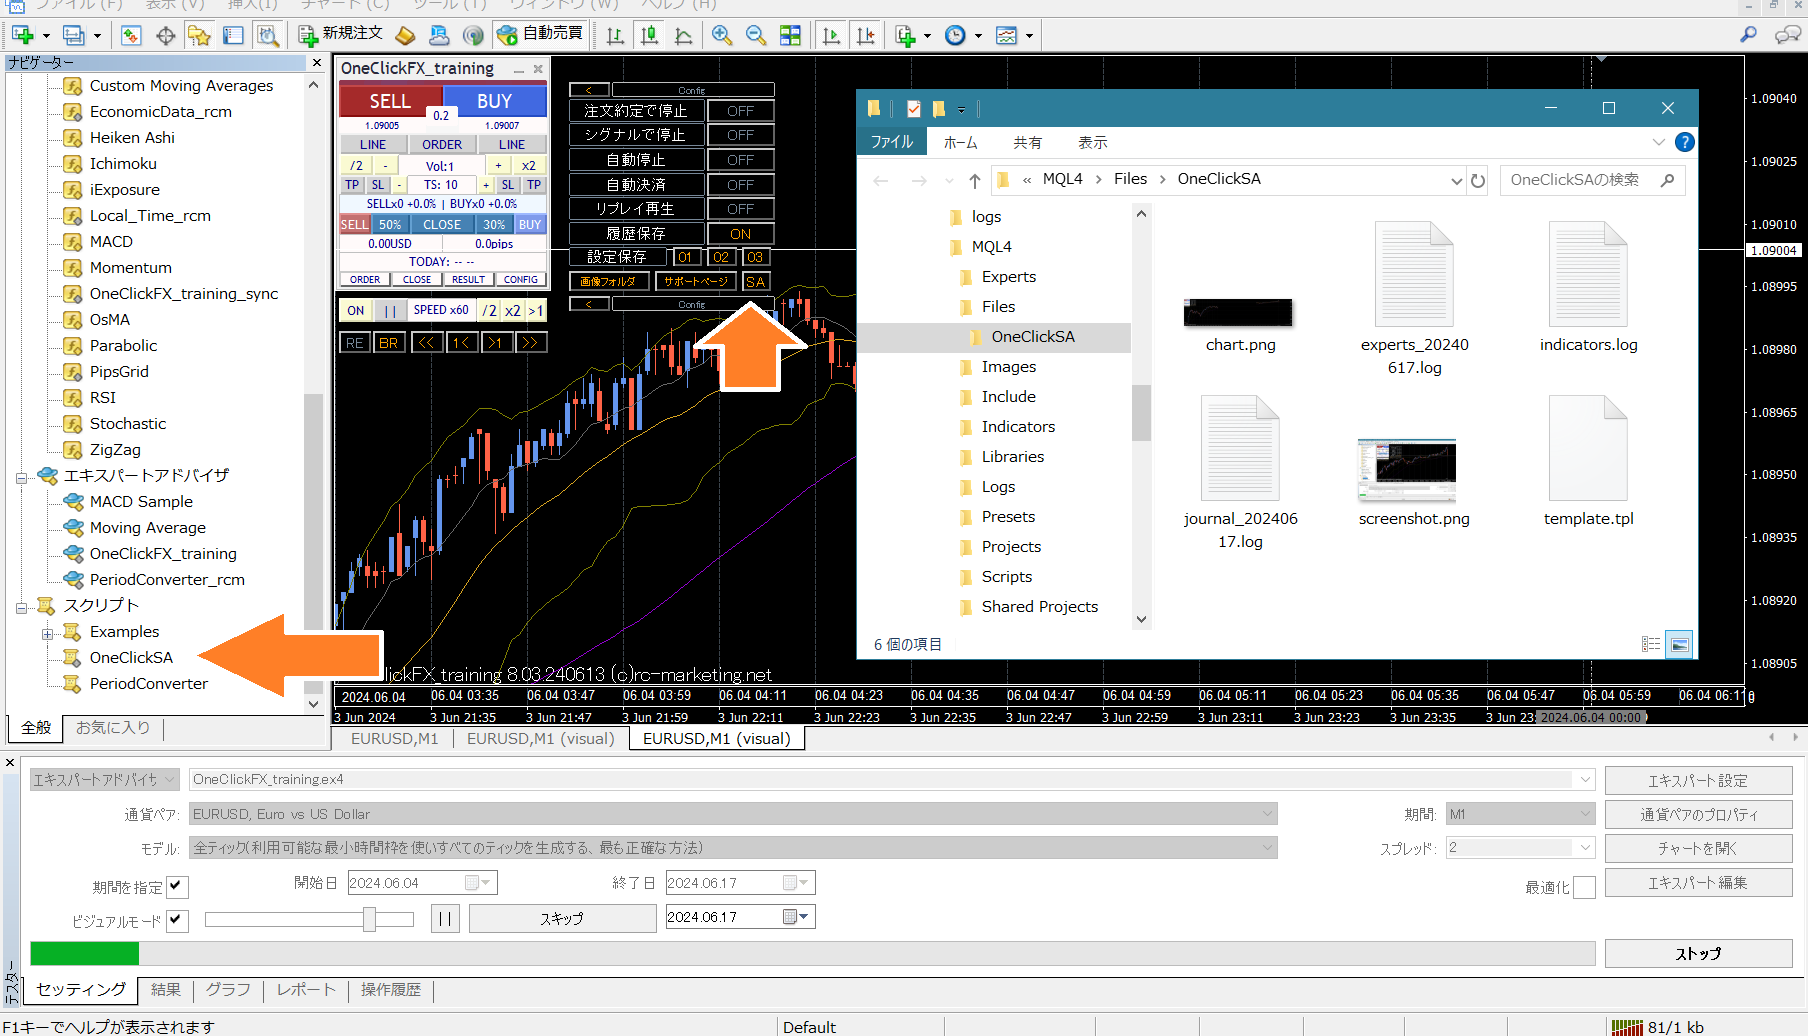
■Support & Assistant
A convenient feature that collects information with one button when you need support.
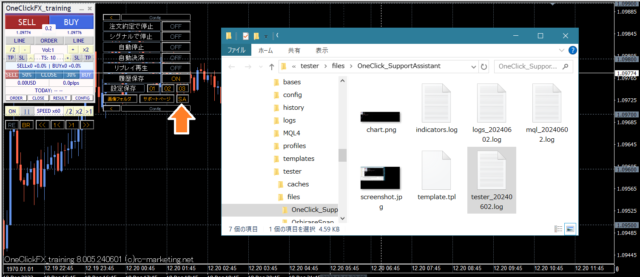
Press the SA button or double-click OneClickSA in the Script folder to collect information; a folder will open, and please email the output files.
※ If you contact us via the inquiry form at the bottom of the page, please attach the files in the automatic acknowledgment email that follows the form submission.
■Sub-Charts Synchronization Settings
One-Click FX Training, etc., can also create synchronization sub-charts for One-Click FX Arrows. For details, please see theOne-Click FX Training page.
Support page for One-Click FX Training MAX■Linkage with Signal Tools
One-Click Auto Arrow Trading [AutoArwTrade] and includedSignal Arrowization Tool
■Linkage via One-Click Auto Arrow Trading [AutoArwTrade]
1. Load a compatible signal tool on the chart.
Then automatic trading starts.
■Linkage via Signal Arrowization Tool
Linkage with signal tools can be configured using the parameters described above for One-Click FX, or by using the includedSignal Arrowization Toolto link with other signal tools’ arrows.
Signal Tool Arrowization Tool (ArwByIdx_rcm) allows entry when arrows from other signal tools appear, and entry on chart changes like crossovers.
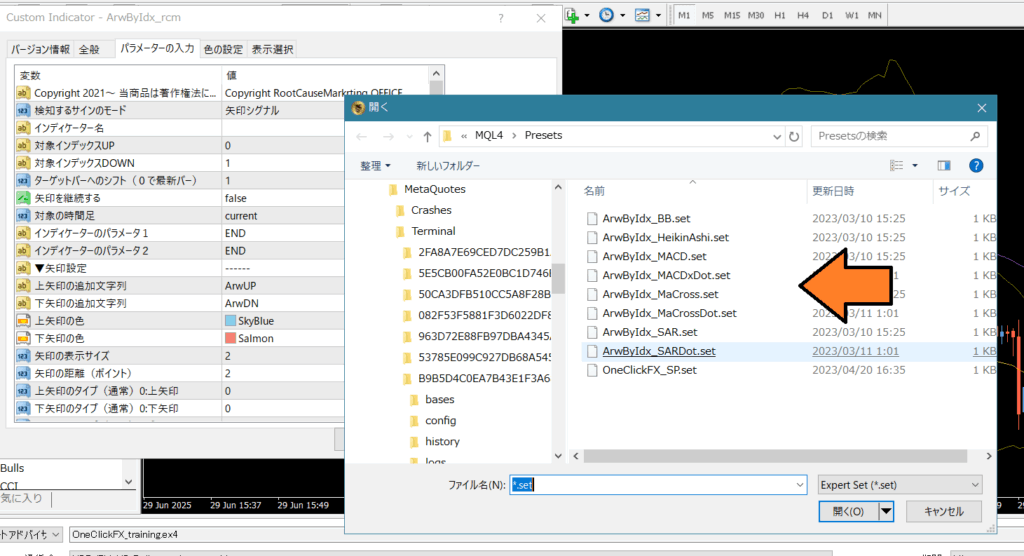
After starting the tester,ArwByIdx_rcm should be added to the chart; you can try the included sample presets.
■Complex Condition Signal Linkage
Linkage parameters can be connected with comma-separated values as follows.
Sell signal object names: MACDxDotArwUP, MAxDotArwUP, BandsArwUP,
Buy signal object names: MACDxDotArwDN, MAxDotArwDN, BandsArwDN,
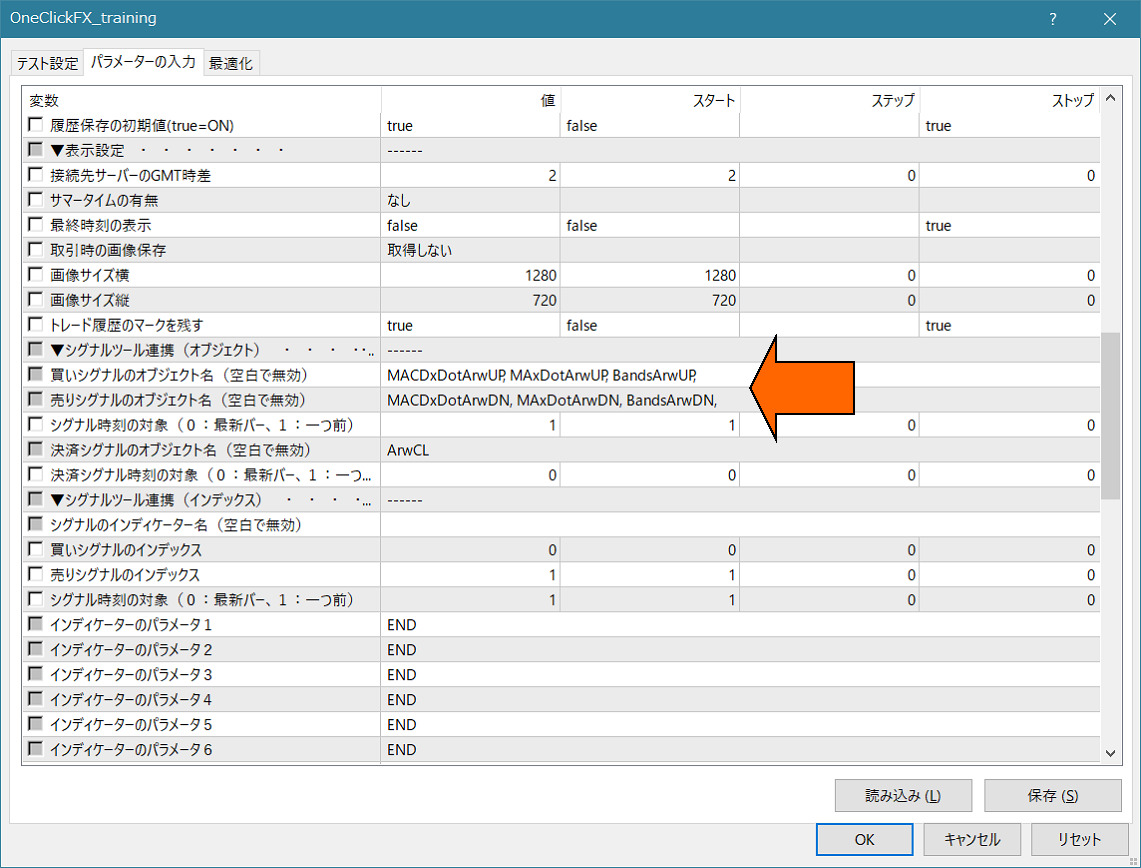
Configure the above settings and run with the simple linkage as well.
Arrows or dots appear at the respective limits, and when all three conditions match, signal linkage activates.
“ArwByIdx” parameters can be changed and registered in the standard charts, so you can freely modify standard charts even while the tester is running.
Experiment with combinations freely.
If you don’t know how to set it up, feel free to consult us. Your own signal tools can be linked with almost certainty.
If you provide the signal tool name and parameter information, we should be able to explain the configuration.
Included or Distributed Indicators
PipsGrid Support PageSignal Arrowization Tool [ArwByIdx] Support Page
Ultra Lightweight Grid & Japan Time [Local_Time]
【2024版】How to Prepare MT4 Historical Data Without Loss
One-Click Support Assistant [OneClickSA] Support Page
Troubleshooting & Tips
・Prepare historical data
【2024版】How to Prepare MT4 Historical Data Without Loss
・Profit/Loss on accounts with fees
For accounts with fees, profit/loss includes fees, while PIPS displays exclude fees.
Note that fee scenarios vary, so not all are guaranteed.
・License authentication error
Possible causes: email address not belonging to purchaser, email not entered correctly, Windows not up to date, or other security tools blocking. If unsure, contact support.
■Important Notes
This is a diverse market, and we cannot guarantee compatibility with all signal tools. Especially products protected by password or signal tools with countermeasures cannot be linked. Custom linkage can be produced at additional cost upon request. Please understand that tool results may not reflect actual outcomes. When brokers provide price data that differs from this tool’s display, please understand. To prevent misuse, online authentication is performed via encrypted SSL communications.
If you’re in trouble
If things are not functioning properly, acting strangely, or stopping suddenly, first check this area.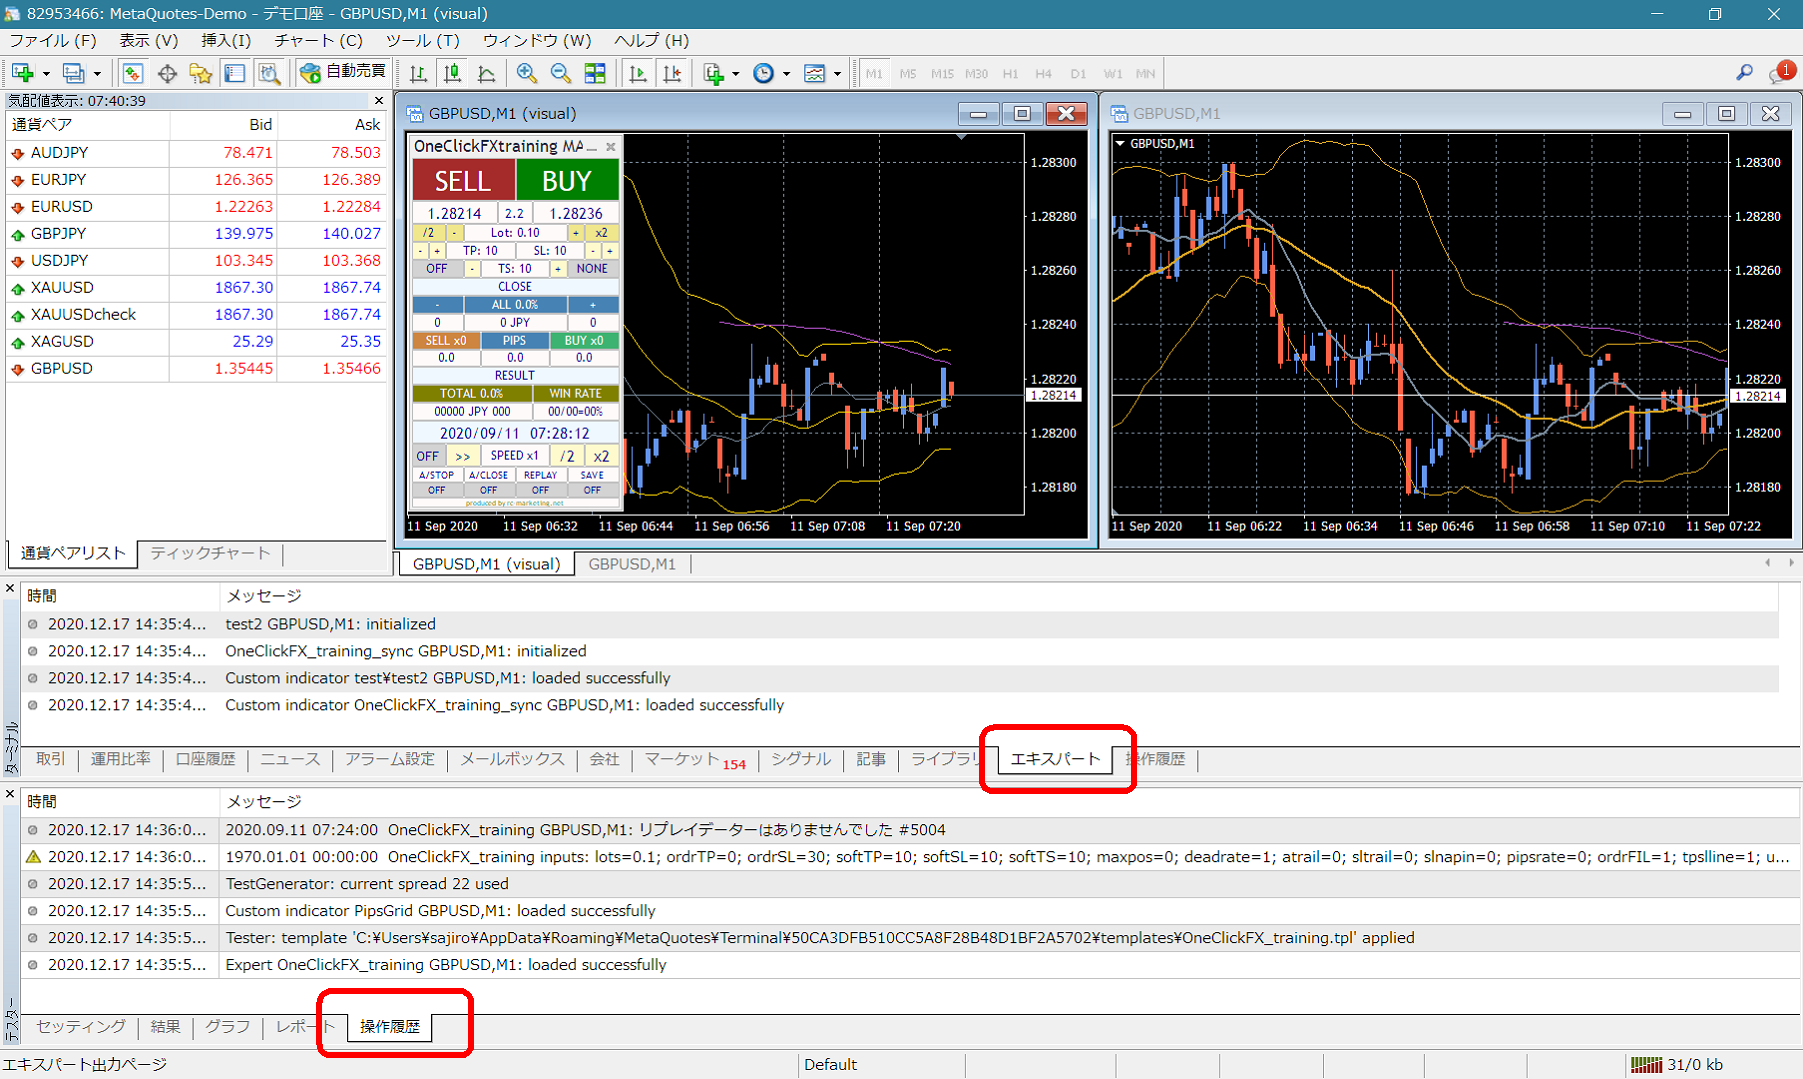 If you see error messages in the terminal’s Expert or Tester operation history, please inform us of those messages to help us respond more smoothly. We appreciate your cooperation.
Support & Assistant
For some products, a convenient feature is included that collects information with one button when you need support. Press the “SA” button to collect information and open the folder. You can also double-click the Script folder’s OneClickSA to open the folder in the same way.