
Registration method and usage of Bellwallet, what will happen in the future!?
I own Bell Coin, but I’m a little worried about leaving it on an exchange...
This article introduces, with photos, how to register and use Bell Wallet (Bell wallet) for those who are thinking that way.
I understand the feeling of wanting to store it in a wallet!
Because if an exchange is hacked and you end up exchanging ICO-splitted coins for Bell Coin, you would lose more than the ICO-splitted coins themselves.
However, now that Bell Wallet has been released, there is no longer a concern about losing precious assets, so please rest assured.
If you still don’t know Bell Coin (BLL),click here← read this before learning about Bell Wallet.
Now, let’s first read about the overview and features of Bell Wallet.
Features of Bell Wallet

The standout feature of Bell Wallet is that it is a wallet officially released by the cryptocurrency exchange BellWood, located on the island of Malta.
Generally, most issuers of cryptocurrencies publish wallets, right?
For example, NoaCoin’s Noa Wallet, and the now-defunct WisCoin, etc.
However, most cryptocurrency projects publish wallets that are mainly used to store cryptocurrencies.
But Bell Coin, an indigenous token issued by the BellWood exchange, has a feature to buy back ICO-splitted coins at a high price.
Furthermore, in the future, by using Bell Coin, you may be able to exchange it with a cryptocurrency portal site that is currently attracting attention, Crypto Chatty.
As with many cryptocurrencies, simply issuing a wallet does not automatically make it a superior cryptocurrency, to be honest.
However, BellWood, the exchange developing Bell Wallet, is unlike other cryptos in that it steadily adds functions, so it might be trustworthy.
We’ll discuss Bell Wallet’s future in more detail later, but let’s look at how to register!
How to register Bell Wallet (Bell wallet)
First, let me say that registering Bell Wallet is very easy!
It won’t take 3 minutes. It’s like making cup noodles, haha.
First, access the Bell Wallet official site. The official site ishere←

Then press “Create wallet” at the bottom.
When the new registration screen appears,
・E-mail: your email address
・Password: a new password
Enter them and press “Register”.
When you select “Register,” you’ll be in a provisional registration state, and a URL for completing registration will be sent to the email address you entered.
Access the URL, enter your registered email address and password, and click “Sign in”.

Once you can log in, Bell Wallet registration is complete.
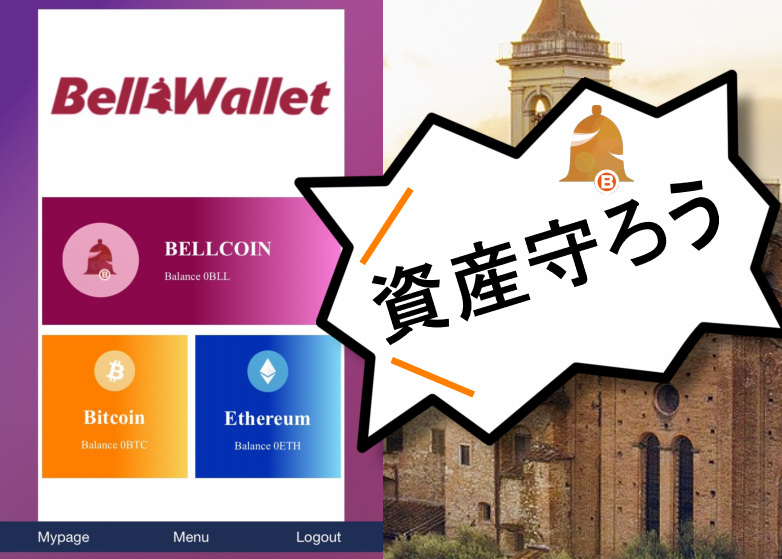
When the following image is displayed, registration is complete, so please use it as a reference.

See? Registration for Bell Wallet is easy, right?
You might even finish before your cup noodles are ready, haha.
Note
If you don’t access the URL provided in the official registration email, Bell Wallet registration cannot be completed.
After entering your email and password on the new creation screen, be sure to access the wallet from the URL.
Also, if you use a carrier email, there is a possibility that the email won’t arrive.
Therefore, use a free email or set domain reception restrictions.
Bell Wallet domain name: @bellwallet-malta.com
How to use Bell Wallet (Bell wallet)
Now that registration is complete, you need to know how to use it.
As of January 2019, the following 3 cryptocurrencies can be stored.
・Bell Coin (BLL)
・Bitcoin (BTC)
・Ethereum (ETH)
Now, let’s look at how to use each one by one.
How to send Bell Coin with Bell Wallet
First, to send Bell Coin from Bell Wallet, click the BELLCOIN button as shown in the photo below.
Then, click “Send,” enter the recipient address and amount, and click Send to complete the transfer.

Next, how to receive Bell Coin in the wallet: click “Receive” beside the “Send” button.
Then a QR code and your address will be displayed, so choose whichever you prefer to receive.

This completes the total Bell Coin receipt.
How to send Bitcoin with Bell Wallet
Next is Bitcoin.
Similar to Bell Coin, click the Bitcoin button.
Then, click “Send,” enter the recipient address and amount, and click Send to complete the transfer.

To receive Bitcoin in the wallet, click “Receive” beside the “Send” button.
Then a QR code and your address will be displayed, so choose whichever you prefer to receive.

This completes the total Bitcoin receipt.
How to send Ethereum with Bell Wallet
Finally, sending Ethereum.
Similar to Bell Coin, click the Ethereum button.
Then, click “Send,” enter the recipient address and amount, and click Send to complete the transfer.

To receive Ethereum in the wallet, click “Receive” beside the “Send” button.
Then a QR code and your address will be displayed, so choose whichever you prefer to receive.

This completes the total Ethereum receipt.
Now, let’s look at Bell Wallet’s menu.
Bell Wallet (Bell wallet) Menu
Bell Wallet’s menu has three items:
・TOP: Return to the home page
・T&C: Terms of Use
・Privacy Policy: Personal information protection policy
.png)
In T&C, the terms of use for Bell Wallet are described.
It’s in English, so use Google Translate or similar to translate to Japanese before using it.

Finally, the Privacy Policy is described in English like the T&C, so translate to Japanese before reading.

Even though Bell Wallet registration is easy, when using a service for the first time, be sure to read the terms and conditions.
In case a problem arises, it could become a matter of “what was written vs. what wasn’t,” so understand not only Bell Wallet but any new service you use.
Bell Wallet (Bell wallet) Future Developments
Now that you’ve read this far, you probably have a grasp of Bell Wallet’s general features.
But what’s truly important is what comes next!
Because, like many wallets, what matters is what happens after release.
For example, no matter how much attention a wallet attracts, if the currencies it can store are few, it lacks convenience.
Bellwood’s official announcements state the following:
It will be able to store Bell Coin, the exchange’s own currency, as well as Bitcoin and Ethereum.
Also, within Bell Wallet, there is a feature to use the registered email address as a transfer address when sending between wallets.
※ currently only BELL COIN can be sent; other currencies are planned to be implemented progressively.
Future features for Bell Wallet
Wallet design changes
Allow sending other currencies using an email address
Although Bell Wallet was released recently, in the future it will add more supported currencies,
・Design refresh
・Enable sending via email address
The above features are expected to be added.
Registration and use of Bell Wallet are free, so
why not register before more features are added?
※ After registering Bell Wallet, to improve usability later, add it to your home screen or bookmark it.
If you want to know more about reviews, please see Crypto Trivia site.
× ![]()