

【Episode 06】RCI x 3: "Double Ceiling and Double Bottom"—What About It? (All 15 Episodes)
|
Please! If you are viewing this serialized article for the first time, please be sure to start from “Episode 1”! We have included very important content in the first half, and in this explanation you will encounterIndicatorandSign tools,Tester EAalso available for free! |

RCI “Double Top/Double Bottom”
Other currency pairs × timeframes
Hello!
We are the Trezo development team!
In the previous article, we finally tested using the tester EA.
“Closing a Buy position at the moment of acquiring a Sell position,” “Closing a Sell position at the moment of acquiring a Buy position,” andholding a position until obtaining a signal in the opposite directionmay be a transaction method not often used in practice, but we hope you understand that it is one way to gauge effectiveness.
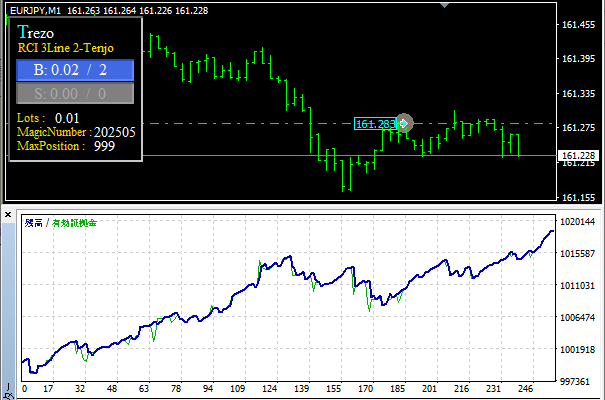
First, we did tests on EURJPY×1 minute chart with other methods such as DeMarker and Trailing Stop as well.
We also tried both the case of a single position and the case of multiple positions where all signals are taken when they appear.
This time again we want to show you something new. There will be several interesting points, so let’s proceed with anticipation!

So this time, we will also test on other currency pairs and timeframes.
This time too【Case: A (Trend)】vs【Case: B (Reversal)】will be the key.
If you have forgotten the words【Case: A (Trend)】and【Case: B (Reversal)】or have not yet seen an explanation about this, please view “Episode 4”!
After trying several settlement methods,
we determined that the next two were not very effective at an early stage, so they were excluded from the test scope.
① Settlement by RCI short base line
:Buy position: close when long-term line and mid-term line are 80% or higher
:Sell position: close when long-term line and mid-term line are -80% or lower
In winning patterns, after acquiring a position, the short base line often reaches 80% around 4 to 7 bars, resulting in too small a profit range. In the losing pattern of Case B (Reversal), that loss can multiply several times more deeply.
From these points, the risk versus reward did not justify continuing the test, so it was dropped.
② Settlement by DeMarker
In this case as well, same as above. The “risk” versus “reward” did not justify continuing the test.
The tester EA still has this function, so if you adjust the settings it might become a viable method, so please try if interested.
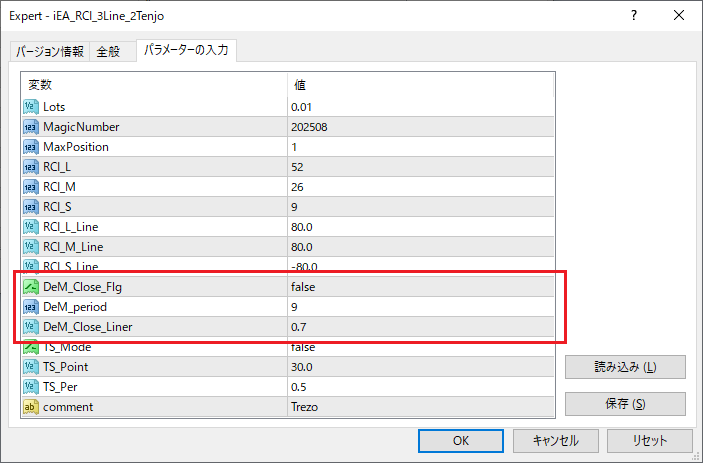

Now we will introduce the default test results and some successful examples obtained by changing parameters for comparison.
(After doing one thing, it turned positive!)
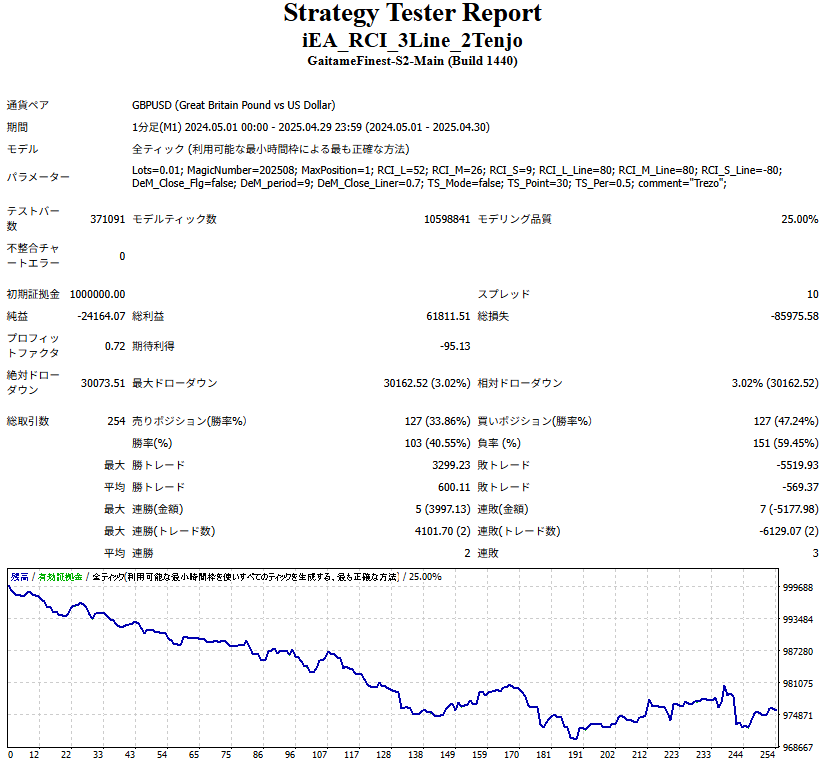
【Default】
■1 year
■Currency pair: GBPUSD ■Timeframe: 1 minute
■Maximum positions: 1
■RCI acquisition lines: Long-term 80%, Mid-term 80%, Short-term -80% (default)
■Settlement condition: When opposite position is acquired
■Settlement options: No DeMarker, no trailing stop

【Custom】
Changes
■Maximum positions: 999 (no upper limit)
■RCI acquisition lines: Long-term 80%, Mid-term 60%, Short-term -90%
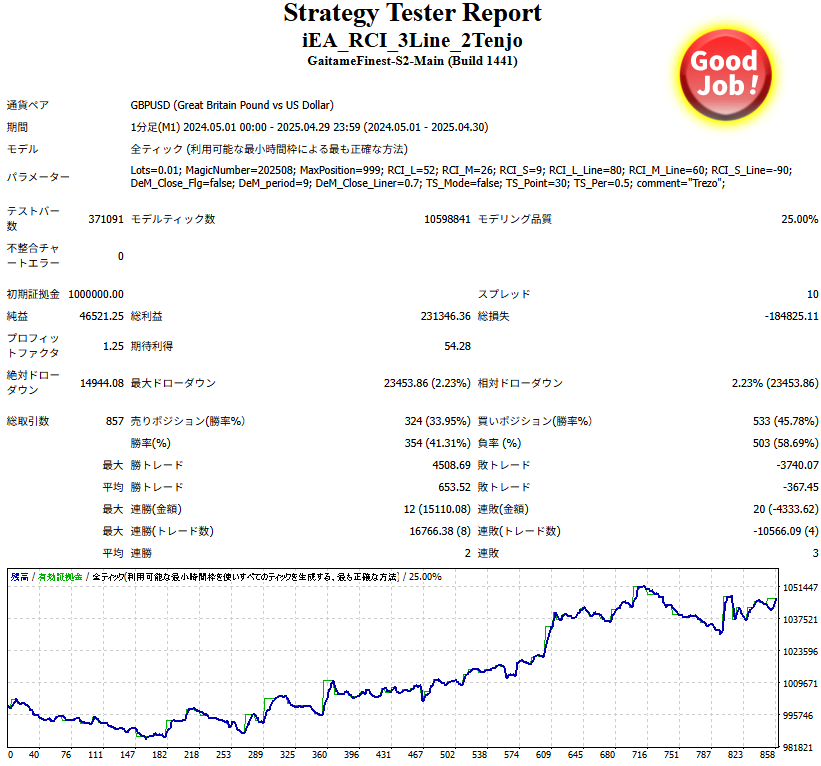
This example shows a parameter change.
A little adjustment often makes it adaptable to the current market.

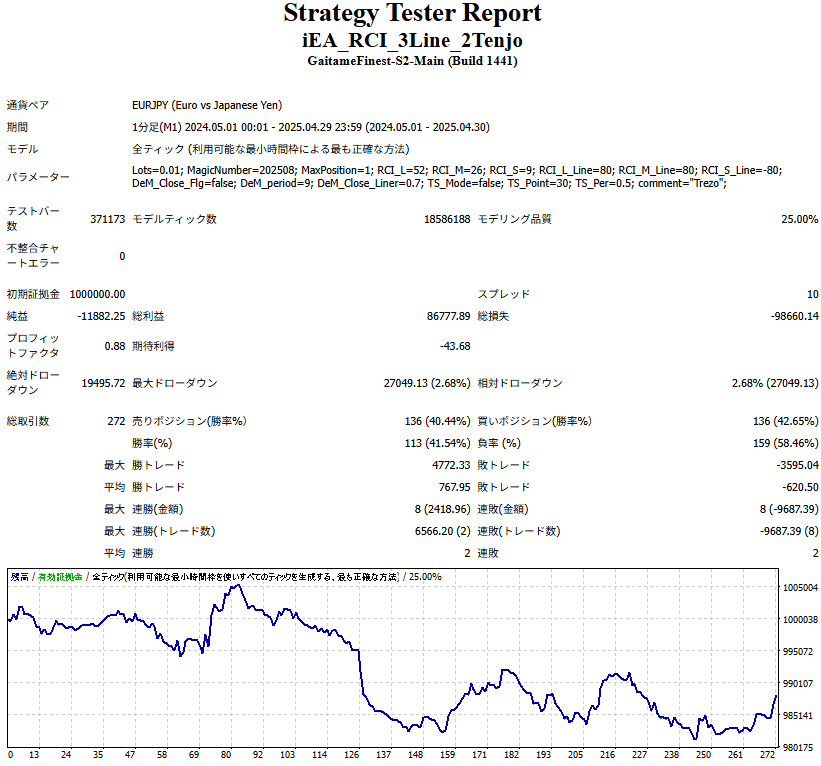
Next is EURJPY.
This currency pair is widely used, isn’t it?
Many say it’s easy to read the trend.
The result turned out as follows.
【Default】
■1 year
■Currency pair: EURJPY ■Timeframe: 1 minute
■Maximum positions: 1
■RCI acquisition lines: Long-term 80%, Mid-term 80%, Short-term -80% (default)
■Settlement condition: When opposite position is acquired
■Settlement options: No DeMarker, no trailing stop

【Custom】
Changes
■Maximum positions: 999 (no upper limit)
■Settlement option: Trailing Stop "Available!"
■Strategy mode: 【Case: B (Reversal)】

What is 【Case: B (Reversal)】...
Sorry for the sudden question!
This will also become possible.
Next time we will explain this area too!

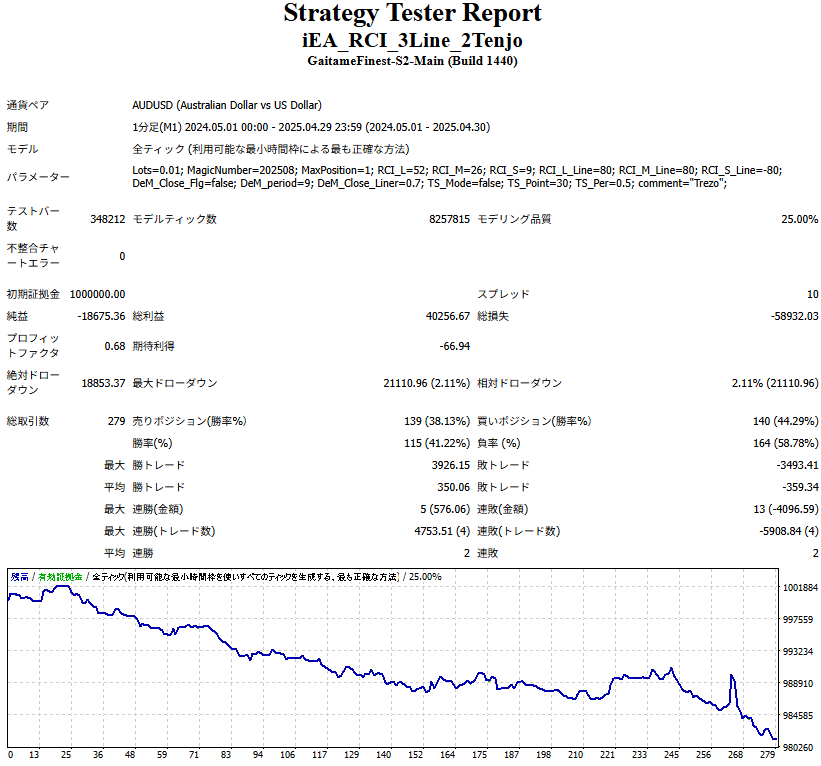
For reference...
The default for AUDUSD turned out like this.
Over the year, almost a clean downward trend!
Doesn’t this feel like a sign of opportunity?
This will also be a tease for next time!

【Important!】
For discretionary trading methods, the period is recommended as “1 month,” “3 months,” or at most “6 months,” and the number of trades should be more than “100 times” to yield favorable results.
This project is not about EA development, so there is no need to seek conditions that work for 10 or 20 years. Probably there is no extremely long-term method that keeps winning explosively by hundreds to one, and since this time is discretionary trading you can pick currency pairs, methods, and settings that allow you to efficiently profit as you decide.
If market trends change or upon necessary verification, we will switch to better conditions. By repeating this, we can respond to market changes and always trade efficiently. Also, reasoning in this manner will give you confidence in your own trading.
Anyone can easily do this, so please stay with us for a few more episodes!

Please also take a look here!
 |
 |
 |
||
EURJPY -M15- |
CHFJPY -M15- |
AUDJPY -M5- |
||