

Stop-loss logic and EA-specific risk management methods [Hybrid FX Trade System Ajinitchi Vol.9]
Good morning, everyone.
My name is Ku (Ku-u), a part-time trader.
Today as well I recorded a video commentary for the “Hybrid FX Trade System Aji-nitchi,” so if you’re interested please take a look.
Today's theme is, as the title suggests, the advantages of risk management by combining stop losses with EAs.
I use a martingale in a trend-following entry method and counter-trend approach.
For this video, the definition of a trend-following entry is selling during a downtrend and holding a short position.
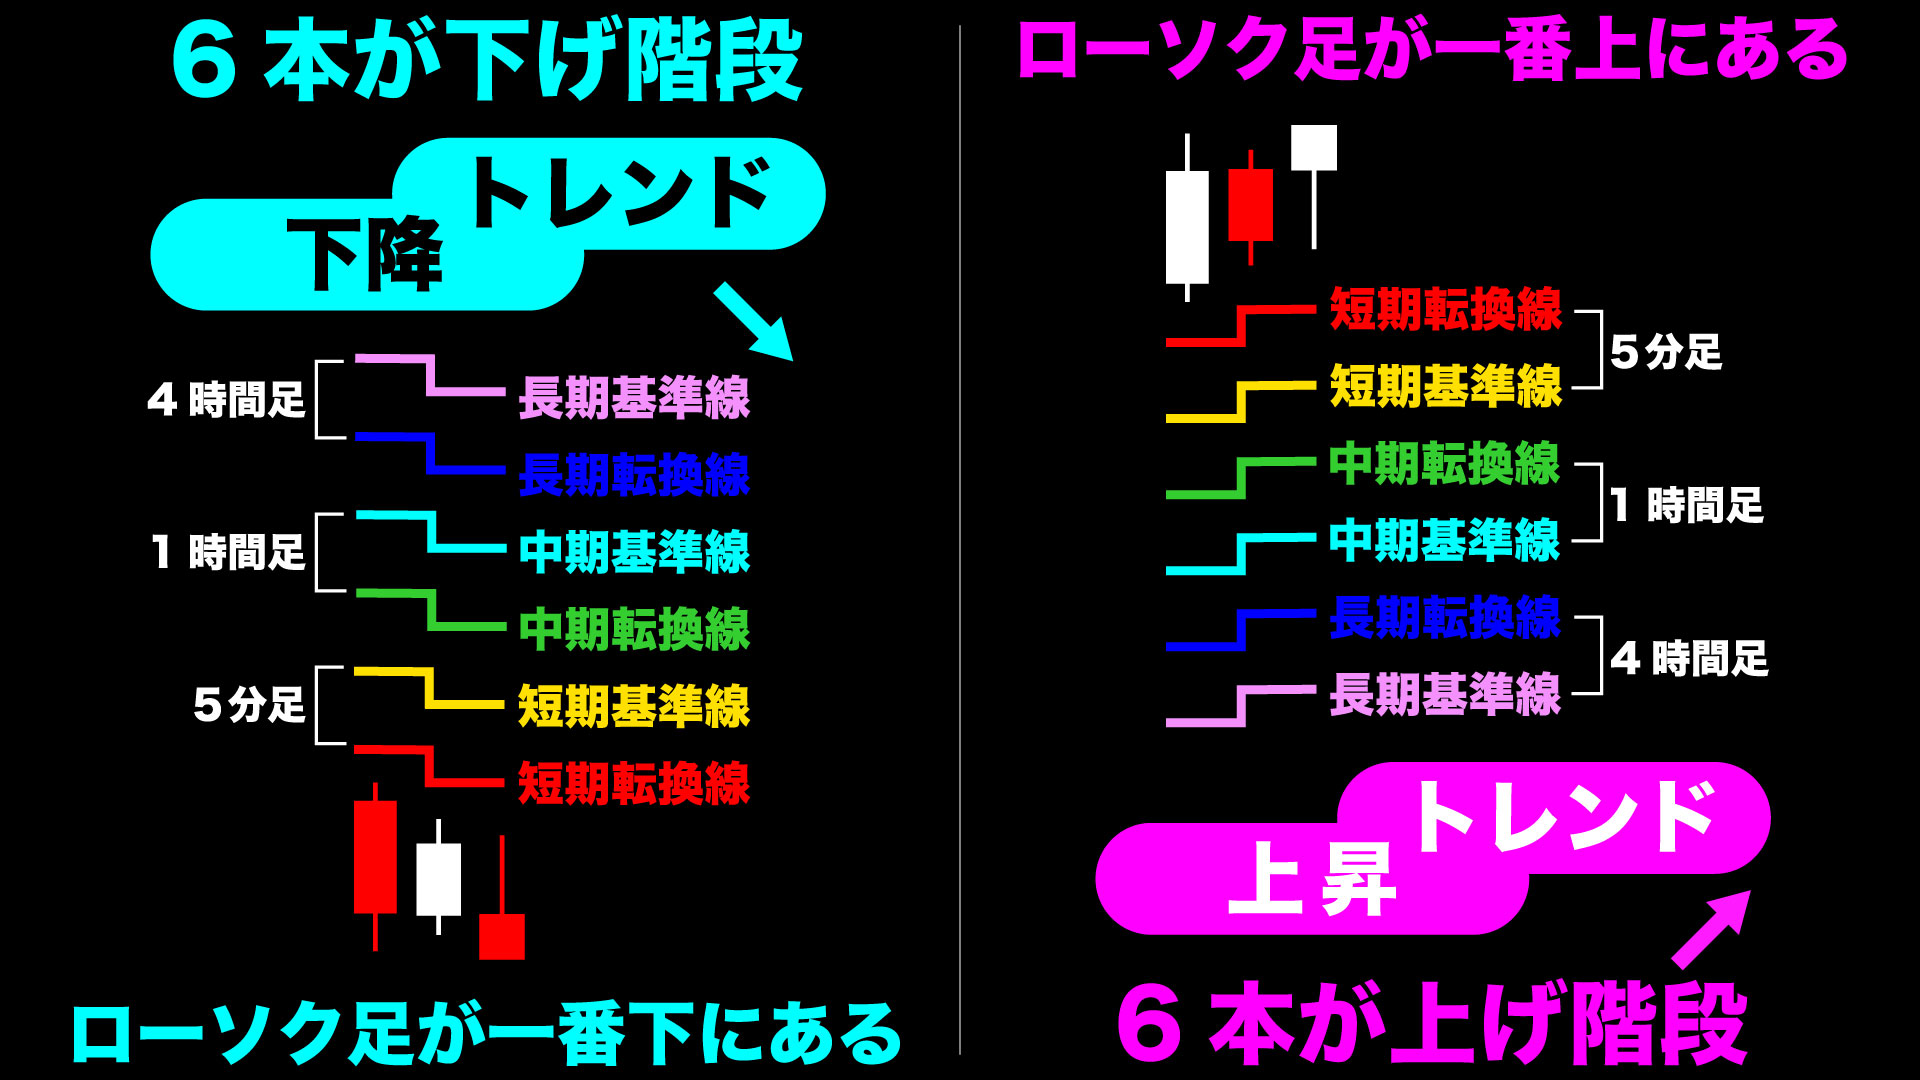
The definition of a downtrend is that the signal confirms with a downward arrow, or even if there is no signal, a death cross is formed by six lines.
In this case, since a death cross was formed and the perfect order completed and price was dropping, I placed a limit order to sell when the price rose to a certain level, i.e., the price at which I would sell.
Within this trend-following scenario, when the price retraces to exceed the previous high, the near term is rising.
Even though it’s rising, since we are selling, this becomes a counter-trend situation.
As mentioned at the start, this is what “counter-trend within a trend-following” means here.
The concept of a limit order is a counter-trend idea.
The concept of a stop-loss order is a trend-following idea.
There are other aspects as well, but I will explain them in order.
A sell limit order, in this video, means placing a sell order at the retracement high during a downtrend.

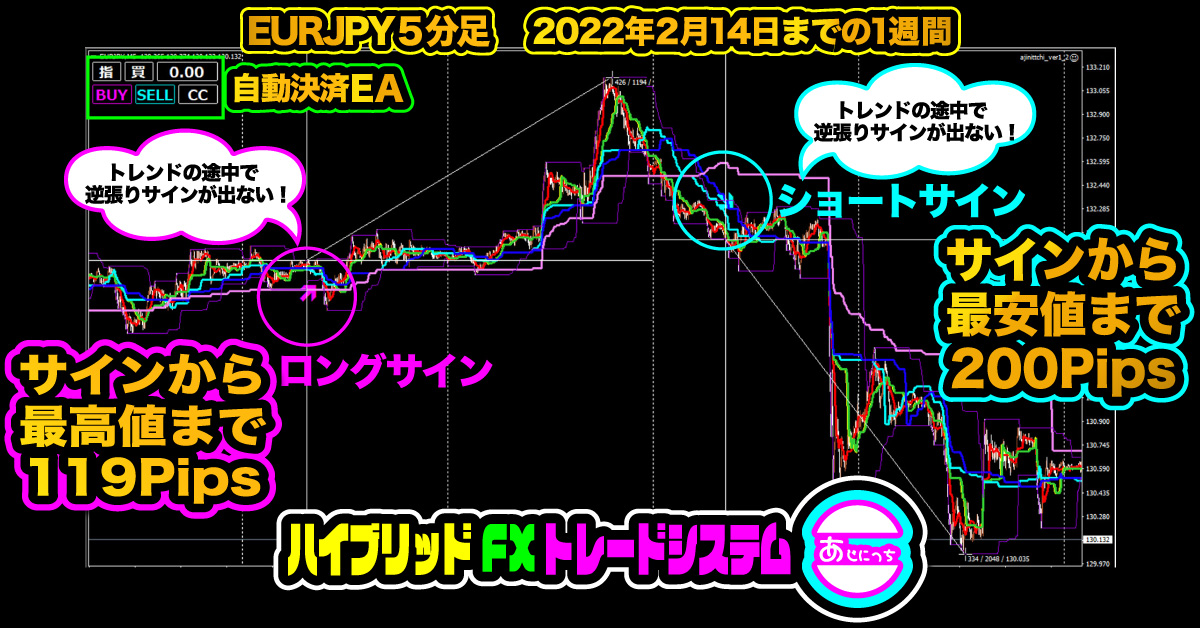
Although a death cross formed recently and the price continued downward with a perfect order, I happened to look at the chart during a sharp rebound that formed a retracement high, so I placed two sell limit orders in the pink right-hand square, and both positions were filled.
One is a 1.0 lot sell.
The second is a 2.0 lot sell, bringing the total position to 3.0 lots when I started recording.
Why did I record this? Because if the market turns higher again after this, the EA would automatically trigger the stop-loss for the first entry when it is filled.
Then you’ll see a scene where all positions of the same currency pair are settled at once without further action.
The EA risk management method has repeatedly shown that just by entering, two lines for stop-loss and take-profit are drawn automatically; even if you move that stop-loss line manually with drag-and-drop, multiple positions for the same currency pair still settle all at once in a single event.
This feature is actually very important.

In my 15 years of market experience, the reason I lost for 10 years was because I didn’t manually manage these bothersome stop-losses.
With averaging down (grid trading), you hold a large number of positions, so manually inputting each position’s SL and TP was extremely tedious, which led to irrational optimism and not setting SL or TP at all.
Martingale is also one of the methods I have used for 15 years, but as you increase positions, manually inputting SL and TP values became very tedious.
For example, as in this case with Martingale you have 7 positions at 1, 2, 4, but with averaging you have 7 positions at 1, 1, 1, 1, 1, 1, 1.
With Martingale you have three positions’ SL/TP total six lines, but with averaging you have 14 SL/TP lines.
The tedious part is moving the SL/TP; you had to manually enter multiple SL/TPs one by one.
Even just the first entry, depending on whether you place a stop loss, could result in a large unrealized loss by the next day.
Hence, I developed an EA feature that for the same currency pair, no matter how many positions you increase, one stop-loss line is managed automatically by the EA.
“Aji-nitchi EA” is very convenient once you try it.
Right now, if you purchase the “Aji-nitchi Indicator,” we will give you the super-convenient “Aji-nitchi EA” for free!
Don’t miss this opportunity!
Now, moving on.

According to Dow Theory, when highs are rising and lows are rising consecutively, the probability of the trend continuing is high.
As shown above, we don’t know how far the lows and highs will continue to rise.
Therefore I decided to place a final 4.0 lot sell order and reduce the stop-loss width to be smaller than the default 50 pips.
As of the above image, the final 4.0 lot has not yet been filled.
However, in the image below, after the high was updated, it is clear that the sell limit was executed.

The position increased, totaling 1.0 + 2.0 + 4.0 = 7 lots.
If you look up, there seems to be about 20 pips left until the stop-loss.
If you do nothing, this could result in a large loss when the stop-loss hits, so we need to reduce risk a little more.
Therefore I planned to shoot a scene where, using one of the EA features, by manually moving the stop-loss line with a single drag-and-drop, all positions of the same currency pair would be settled when they touch that line.
This is a feeling you only understand if you’ve used it, but it is one of the most convenient EA features.

Next I moved the stop-loss value downward manually, and decided that if the most recent high is not exceeded any more, I would admit a loss.
Thus, leaving it as is could reduce a 50-pip stop-loss by about 20 pips.
This is because positions were accumulating via Martingale, so the risk was increasing and required a smaller stop-loss.
If you don’t use the EA, each of the three positions has an SL and a TP, so you would need six operations.
But by using the “Aji-nitchi EA,” you only need two operations to move the SL and TP lines, reducing the workload to one third and greatly increasing efficiency.
To reiterate, even with three positions, you only need to move one stop-loss line once.
The video also moves the TP, so one action suffices there as well.
All other position management is handled by the EA.
And by manually DnD-ing a single stop-loss line, all positions for the same currency pair are settled at the same price.
This is an example of a stop-loss, but the same EA feature also resets all take-profits and pending orders (limit and stop orders) at the same time.
One of the important things in the market is to have no positions and calmly observe the market.
To do that, it’s important to settle everything and delete the pending orders and stop orders, clearing the mind in a good way.
By controlling just one stop-loss line, you can see multiple positions being settled simultaneously.
This feature is for the same currency pair; positions on other pairs are not affected.
That’s all for the risk management method of the “Aji-nitchi EA” that I wanted to introduce to you today.
See you again!


