

【Video Explanation】Average Cost Averaging Technique: Flexible with LITE - How to Use, Five Scenarios
Serial Publication: Yoko and Kenji's GOLD EA Mastery Notes, Episode 19
Hello, this is Yoko.
In the last issue, I promised, “Next time we’ll show you in detail with visuals.” This time,we will show you viaa video. On a stopped screen, it’s hard to convey how the panel moves,“after pressing the button, how the panel moves”is what you can see directly in the video.
This time’s video consists of five parts
① Basic flow (about 2 minutes 10 seconds)
② Set the parameters and make the panel smaller (about 53 seconds)
③ Then just wait (about 26 seconds)
④ Manually settle without waiting for TP (about 51 seconds)
⑤ If you raise the lot size (about 1 minute 28 seconds)
All the videos arescreens of MT5 Strategy Tester running backtest data. The yellow frame and callouts were added later for explanation.
① First, the basic flow
Choose a preset and enter the first order with your own button. If the price moves unfavorably, you add more (averaging down); if it moves favorable, you take profits and exit. After exiting, it also automatically re-enters according to settings, and it will display outside operating hours as well.

Video ①: Basic flow (about 2 minutes 10 seconds)▶ View on YouTube
1. Choose a preset
From the panel “SET,” select one of the six to use. The currency, strategy, and operating time are decided together.
2. Enter the first order
Press BUY or SELL. The direction and timing are decided by you.
3. The tool moves thereafter
If the price goes against you, averaging down; if it returns, take profit. Re-entry after settlement proceeds as configured.
② Set the parameters and shrink the panel
After entering the first order,set the post-settlement movement. There are two aspects: the number of repeats and the re-entry conditions.

Video ②: Settings and panel shrinking (about 53 seconds)▶ View on YouTube
1. Manually enter
In the video, SELL is pressed.
2. Decide the number of repeats
Increase the count with the “+” under “4. LOOP.”
3. Choose re-entry conditions
Each time you press the “Reentry” band, it toggles between “Immediate → NextBar → BB Mid → RSI(50).” In the video, RSI(50) is used.
4. Shrink the panel with “−”
When settings are finished, press the minus sign at the top right of the panel. P/L and positions are visible even on a small screen. The chart can be used more broadly.
In the first line of the smaller panel, the number of Loops, direction, and re-entry conditions are shown.Settings can be checked in one line.
③ Then, wait
This is the most important part to convey. After entering the first order and deciding the settings,there is no need to press a button.Averaging down and re-entry after profits are automatically handled.
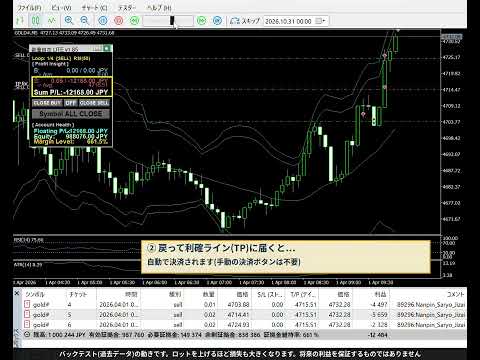
Video ③: Auto re-entry; just wait (about 26 seconds)▶ View on YouTube
In the video, the “Loop” number on the panel moves from 1 → 2 → 3. The manual entry button is never pressed.
④ Manually settle without waiting for TP
I want to settle manually before the take-profit line is reached. For such scenarios, the settlement button islocked to prevent accidental presses.

Video ④: Manual settlement (about 51 seconds)▶ View on YouTube
1. Press “OFF” to unlock
When it changes to “ON” (orange), you can press “CLOSE BUY” and “CLOSE SELL.”
2. Press the side you want to settle
In the video, it is “CLOSE SELL.” The position is settled all at once.
Note
If you manually settle while in a loss, the loss is realized.In the video example, the price moved sharply and settled with a net positive result. This is not always the case.
⑤ If you raise the lot size
When you have confidence in the direction, you can increase the initial lot by using the panel’s “3. Lots.” Video ⑤ showsa backtest where the lot was raised from 0.01 to 0.10.

Video ⑤: Example of raising the lot size (about 1 minute 28 seconds)▶ View on YouTube
In this video, the balance goes from about 1,000,000 to about 1,050,000. However,there is a part where the floating loss expands in the middle, and it is left as is.
Actually, video④ is a continuation of video⑤. At the end of ⑤, the position carried then saw floating lossesup to about -64,000 yen temporarily. After the price recovered, manual settlement was made,ending at +3,992 yen.
Note
Raising the lot size increases not only potential profit but alsofloating loss, required margin, and risk of stop-out, all in proportion to the lot size.When averaging down occurs, the lot size increases further. The videos are just backtest examples and do not guarantee future results. Please decide within your own means and at your own risk.
First, try on a demo account
Follow the five videos on a demo account once. Press BUY or SELL → set the settings → shrink the panel → wait. Once you get this flow under your belt, all you need to decide is the direction.
If anything is unclear, please post in the product community. I will respond.
What’s next for this series
Episode 14: Averaging Technique, discretionary freedom LITE, new release
Episode 15 (this one): How to use discretionary freedom LITE in video
Next: It depends on Kenji’s whim
The videos are also available on YouTube
We prepared a playlist to watch the five videos sequentially.
▶ How to use Discretionary Freedom LITE (playlist)
▶ YouTube channel “Kenji & Yoko’s EA Mastery Notes”
Thank you for reading to the end.
Yoko
※This article introduces how to use the product and does not guarantee future profits. The videos show backtests (past data) and do not guarantee future performance. Floating losses and stop-outs may occur. Please make investment decisions at your own risk. (As of November 1, 2026)