
The real work starts after landing the 9th tranche! The story of how I finally realized the way in and how I kept spending funds【SMC Practice③】
Hello, I’m nao.
In the previous installment (the 8th), I explained in five steps the procedure to articulate a scenario before a trade and draw it on a chart: "decide the direction, identify the zone, prepare multiple scenarios, and draw them on the chart." If you’ve got to this point, the rest iswaiting for the price to come to the zone.
This time’s theme is,“What to do after the price comes to the zone”.
Entry decisions, how to place the SL, and a second chance when OB didn’t work. This article covers these three things. With a certain level of SMC knowledge, you might still think, “But I don’t actually know how to enter,” — this article fills that gap.
This article combines three themes into onesummaryedition. We also prepared individual articles that explain each theme more clearly and in more detail.
→Episode 9-A: Detailed explanations of three entry methods
→Episode 9-B: Detailed explanation of the Unicorn model
→Episode 9-C: Detailed explanations of five ways to think about SL
If you want to grasp the overall flow in one go, keep reading. If you want to read each theme in depth, please refer to articles A/B/C.
OB Rebound Entry
The price reached the OB zone as per the scenario. This is where the real work begins.
However, arriving at the OB does not automatically mean “enter.” This point was also written in Episode 7. After arriving at the OB,wait for the lower-timeframe trigger. This is the basic approach.
Here, I’ll introduce three entry methods. It’s not that one is right and others are wrong; the premise is to choose what fits your style.
● Risk Entry
The simplest way to enter.Enter when the price touches the OB zone. There’s no waiting for lower-timeframe confirmation. You might want to counter, “Earlier I said 'arrived at OB ≠ enter'.” I get that feeling. This method is chosen after judging the OB to be highly reliable, so it’s not simply “enter because it arrived.”
The clear advantage isyou enter at the most favorable price. Since you’re entering at the edge of the zone, the entry price is close to the same SL position (outside OB), improving the risk-reward ratio.
A clear drawback is thatif the zone doesn’t function, you simply take a loss. It’s common to pass right through the OB and move on.
Risk Entry works best under certain conditions: a high-confidence OB (described later), alignment of the higher-timeframe structure and direction, multiple timeframes with overlapped OBs or FVG (MTF cluster), and being within a KZ. The more of these conditions are met, the more “this zone is high-confidence.” Conversely, if the conditions aren’t met, choosing Risk Entry is close to gambling.
● Confirmation Entry
After price enters the OB zone, enter only after a clear reversal signal on the lower timeframe, such as CHoCH, BOS, or engulfing patternsto confirm a reversal.
The advantage is that you enter after seeing evidence that the zone is functioning, sothe win rate increases.
The drawback is that waiting for confirmation makes the entry price less favorableas you enter farther from the zone edge, with a worse risk-reward. If you wait for CHoCH confirmation on M15 or M5, in GOLD you might already have moved hundreds of pips, and in currency pairs like USD/JPY, tens of pips is not unusual.
Also, while waiting for confirmation, price may move and you miss the reversal.
Even so,“confirm before entering” is the safest way to enter. If your style isn’t settled yet, this is a good starting point.
● Nao-style entry (Price Action → Trial Entry → CHoCH follow-up)
This is the middle ground between Risk Entry and Confirmation Entry. It’s the method I actually use.
The idea of this method ishypothesis and verification. When zone reaction occurs, you assume “it will reverse from here” and enter. If the assumption fails, you quickly retreat. This switch is a fundamental premise of the nao method.
There is about ten thousand characters of information beyond this point.
I’ll outline the flow:
→ Zone reached
→ Price action confirmation (pin bar, engulfing, momentum halt, etc.)
→ Trial entry (small lot, tight SL)
→ If recently denied, reverse or retreat
→ M15/M5 (M1) CHoCH confirmation → CHoCH starting point for Fibonacci 50%/OTE follow-up
I’ll explain each step. Of course, if price action is weak, I’ll skip entering altogether. “Just because it came to the zone, I must enter something” is not the idea.
When price comes to the OB zone,enter a trial position by watching price action inside the zone
I’ll list representative patterns.
For example, if a sweep (briefly pushing above the high/low with a wick and then returning) occurs, you enter at the pin bar. Right after liquidity is taken, the probability of reversal is high.
Even without a sweep, if there is a M5 or higher engulfing pattern plus CHoCH on M1, you enter. A M1 engulfing alone is hard to distinguish from noise, but with CHoCH on M1, you can at least judge that the structure has changed. By the way, M1/M5 engulfings often look like pin bars on M15. The lower timeframe engulfing and higher timeframe pin bars react to the same phenomenon—knowing this speeds judgment when monitoring multiple legs.Often on M15, engulfing on lower timeframes corresponds to a pin bar on M15. The point is that the engagement of the lower and higher timeframe phenomena is the same reaction viewed on different timeframes, which helps speed decisions when watching multiple legs simultaneously.
Additionally, other signals include zone formation timing of the right shoulder in a double-top (bottom), sequences of upper wicks indicating a clear momentum stop, false break patterns, etc. Especially the right shoulder of the double-top, you enter assuming “the W top completes and falls from here.” You can place SL just above the left shoulder high, making it tight and improving the risk-reward. The key isnot to limit to a specific pattern. If price action within the zone shows selling (buying) pressure, that serves as the trigger.
What’s common is that you enter after confirming the “reaction” once price is in the zone. A sweep is a strong reaction in itself; engulfing or double-top reflects reaction plus a change in structure (or pattern completion). This is the core of the nao method.
The key point at this stage is that reversal is not yet confirmed. Therefore, keep the SL tight and the position size modest.If denied recently (within a few lower-timeframe bars), reverse immediately.
After that, if CHoCH is confirmed on M15 or M5, or even M1, draw Fibonacci from the CHoCH starting point to 50% or the OTE zone topursue the follow-up. If the initial trial entry hasn’t hit the SL, you can extend profits with two positions.
This method’s advantage ispartially achieving both price advantage of Risk Entry and safety of Confirmation Entry. The downside is that it has many decision points and can be confusing for beginners. It’s recommended to try after you’re comfortable with Confirmation Entry.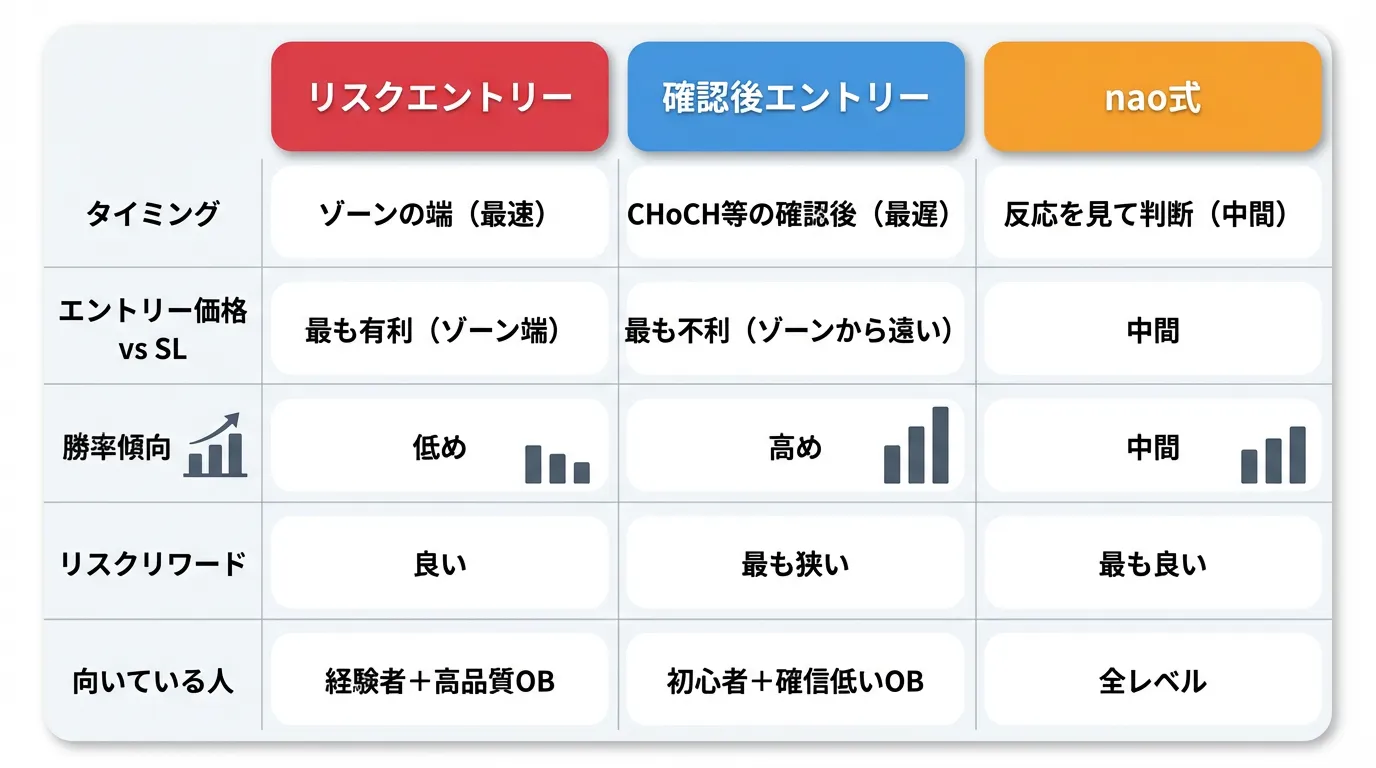
● Reliance on OB “remaining volume” changes the reliability — Purge OB, Fresh OB, OB★
Three methods were introduced, but which you choose depends onOB reliability. Here are the criteria for judging reliability.
First, definitions.OB★ refers to an OB that immediately re-tests after forming and then extends again. This is typically within 30 bars. From here on, I will call it OB★. In English-speaking contexts, this is often called aPropulsion Block.
OB★ has the large players defending that zone. Additionally, the re-test reveals where the actual reaction points were, allowing you to narrow entry points. For example, if the original OB was 100 pips wide and the re-test rebounded near 50% of the zone, you can aim near that area next time. Narrowing entries reduces the distance to the SL, improving risk-reward.
Fresh OB (untested) is when there are still unfilled orders from institutions in that zone. When price returns for the first time, a strong reaction is likely.
These two are not strictly better than the other.Which is better depends on the context. Each has its own strengths:
→OB★: there is a record of large players defending the zone + the entry zone can be narrowed
→Fresh OB: untested with unfilled orders. High expectation of reaction
Howeverthe more re-tests occur, the more orders are consumed, so OBs that have returned many times weaken. Even strong OBs can break within 3–4 re-tests. Higher-timeframe OBs have greater order flow, so they tend to withstand re-tests better.
Another, the strongest OB from the volume perspective isPurge OB, formed immediately after liquidity (SSL/BSL) is swept away. Since the opposing orders are cleared (purged) by a sweep, the remaining volume is at its peak. This is the “liquidity sweep immediately after” condition named OB in Episode 4 as part of “conditions for a strong OB.”
→Purge OB is the strongest candidate for risk entry(swept + maximum remaining volume)